# Wiki
My wiki
# Start
# Donate
{{@43}}
# About
This wiki is supposed to document my knowledge and setup so I don't have to look things up twice. Since you stumbled upon it, I hope it helps you!
Keep in mind that the wiki is permanently under construction. Information might be wrong, incomplete, ... I'm not exactly getting paid to keep it up to date.
# List of all pages
* My:
* [CV](https://rys.rs/CV)
* [Contact](https://rys.rs/Contact)
* [Hardware](https://rys.rs/Hardware)
* [Software](https://rys.rs/Software)
* [Services](https://rys.rs/Services)
* [Minecraft](https://rys.rs/Minecraft)
* [Recipes](https://rys.rs/Recipes)
* [RSS](https://rys.rs/RSS)
* [Monitoring](https://rys.rs/Monitoring)
* [3D Printing](https://rys.rs/3D_Printing)
* [Arch Linux](https://rys.rs/Arch_Linux)
* [Converting Wii's Bluetooth module to a USB dongle](https://rys.rs/Converting_Wii's_Bluetooth_module_to_a_USB_dongle) - for perfect Wii motes connection to the Dolphin emulator
* [Creating a bootable flashdrive](https://rys.rs/Creating_a_bootable_flashdrive)
* [Electronics](https://rys.rs/Electronics)
* [eGovernment](https://rys.rs/eGovernment) - For Czechia
* [Dolphin](https://rys.rs/Dolphin) - The emulator
* [Games](https://rys.rs/Games) - Info for different games I want to keep
* [Geopricing](https://rys.rs/Geopricing)
* [Interesting resources](https://rys.rs/Interesting_resources)
* [IoT](https://rys.rs/IoT)
* [Lenovo Legion 5 Pro Touchpad zones](https://rys.rs/lenovo-legion-5-pro-touchpad-zones)
* [Offensive](https://rys.rs/Offensive) - Attacking Wi-Fi, Rubber ducky, ...
* [Optimization](https://rys.rs/Optimization)
* [Proxy over SSH](https://rys.rs/Proxy_over_SSH)
* [Raspberry Pi as fake mass storage](https://rys.rs/Raspberry_Pi_as_fake_mass_storage)
* [System Administration](https://rys.rs/System_Administration)
* [SSH](https://rys.rs/SSH)
* [System Basics](https://rys.rs/System_Basics)
* [Video Encoding](https://rys.rs/Video_Encoding)
* [webOS](https://rys.rs/WebOS) - LG TV OS
* [Wayland](https://rys.rs/Wayland)
* [Windows](https://rys.rs/Windows)
# Contact me
{{@9}}
# My
# CV
My name is **Martin Rys** and I am a Linux systems administrator born and currently living in Czechia.
My hobbies are reverse engineering, embedded electronics, creating and self-hosting various services.
My hobby projects are mostly available on my [GitHub](https://github.com/C0rn3j) & [GitLab](https://gitlab.com/users/C0rn3j/projects).
__Work experience__:
* November 2016 - Present
* System administrator in a team of four for an SMB in the field of logistics
* My role consisted of:
* Dealing with internal helpdesk tickets from Developers and customers
* Implementing monitoring systems for servers and applications
* Working with CI/CD
* Server maintenance and automation
__Technical background__:
* **Automation:** Ansible
* **Webservers:** Apache, Nginx
* **Programming languages:** Python, Bash, PHP
* **Operating systems:** Linux - Ubuntu, CentOS, Arch
* **Monitoring:** Elastic Stack, Grafana, Icinga, Smokeping
* **Virtualization/Containerization:** LXC/LXD, KVM, Docker
* **Other:** Nextcloud, InfluxDB, MariaDB/MySQL, Redmine
__Education__:
* [Sš a Voš aplikované kybernetiky](https://kyberna.cz/) - Programming, High school graduate - 2012-2016
__Links__:
* LinkedIn: [linkedin.com/in/martin-rys](https://linkedin.com/in/martin-rys)
* Personal website: [rys.rs](https://rys.rs)
* Contact me: [martin@archlinux.org](mailto:martin@archlinux.org) | [rys.rs/contact](https://rys.rs/contact)
__Other__:
* Languages: English, Czech
* Citizenship: Czechia (EU/EEA)
# Software
This page is a list of software I use.
I denote the license in brackets, I try to stick with software that is free and open-source, if a piece of software is not FOSS, source, I mark it red, as I do not want to recommend such, but it is what I am stuck with.
## PC
* [7-Zip](http://www.7-zip.org/) , [p7zip](https://sourceforge.net/projects/p7zip/) (GPLv2 with unRAR restriction) - archiving tool
* [Arch Linux](https://www.archlinux.org/) and [Arch linux ARM](https://archlinuxarm.org/) as my OS for my computers and VPS
* [Arduino IDE](https://www.arduino.cc/en/main/software) (GPLv2/LGPL)
* [Calibre](https://calibre-ebook.com/) - Read ebooks, especially EPUBs
* [Charles](https://www.charlesproxy.com/) (proprietary) – for HTTP monitoring
* [Cheat Engine](https://github.com/cheat-engine/cheat-engine) (No license, source code available) – hacking flash games/SP games - Never attach this to games that use an anticheat unless you aren't afraid of being banned
* [Deezloader Remix](https://notabug.org/RemixDevs/DeezloaderRemix) (GPLv3+) - Download songs from Deezer
* [ffmpeg](https://www.ffmpeg.org/) (LGPLv2.1+) – for simple video editing
* [Firefox](https://www.mozilla.org/en-US/firefox/new/) (MPL 2), [Chromium](https://www.chromium.org/getting-involved/download-chromium) (BSD/MIT/LGPL) - Browsers I use. Chromium is an open-source browser that Chrome builds upon.
* [KDE Connect](https://community.kde.org/KDEConnect) (GPL) - Connect your phone with your desktop - share clipboard, files, read SMS, control media players...
* [KeePassXC](https://keepassxc.org/) (GPL) - Cross-platform password manager, supports OTP (including Steam)
* [Krita](https://krita.org/en/) (GPLv3), [GIMP](https://www.gimp.org/) (GPL), [digiKam](https://www.digikam.org/) (GPLv2) - tools for image editing/drawing
* [Libreoffice](https://www.libreoffice.org/) (various open/copyleft licenses) - An office suite. Be aware that OOXML standard that Microsoft Office uses by default is sometimes(very often) not displayed correctly anywhere, so get people to save in ODF formats instead.
* [MultiMC](https://multimc.org/) (Apache v2) - Minecraft launcher
* [Mumble](https://wiki.mumble.info/wiki/Main_Page) (BSD, GPL), [Riot](https://riot.im/) (Apache v2), [Telegram](https://telegram.org/) (GPLv3, proprietary server) - chat/voice/video clients with E2E encryption that are actually worth something. I use Telegram for stuff that can be insecure as they roll their own crypto and don't encrypt conversations and group conversations by default
* [Nvidia drivers](https://www.nvidia.com/Download/index.aspx) (proprietary) – Since the open-source nouveau driver won't work properly unless Nvidia releases the necessary firmware blobs
* [OBS Studio](https://obsproject.com/) (GPLv2+) - capturing video/streaming
* [qBitTorrent](https://www.qbittorrent.org/) (GPLv2+) - A torrent client.
* [redshift](https://github.com/jonls/redshift) (GPLv3) - tool for colorshifting to rest your eyes
* [smplayer](http://www.smplayer.info/) (GPLv2+) with [mpv](https://mpv.io/) (GPLv2) as a backend - to play videos
* [Steam](http://store.steampowered.com/about/) (proprietary), [GOG Galaxy](https://www.gog.com/galaxy) (proprietary), [Uplay](https://uplay.ubi.com/) (proprietary), [Origin](https://www.origin.com) (proprietary), [itch](https://github.com/itchio/itch) (MIT) - clients for games
* [SmoothVideoPlayer](https://www.svp-team.com/wiki/Main_Page) (proprietary) - to do on-the-fly video interpolation - let's me watch movies and shows in 144 FPS
* [Ventoy](https://github.com/ventoy/Ventoy) (GPLv3) - Create a multiboot flash drive that actually works
* [virt-manager](https://virt-manager.org/) (GPLv3+) and KVM/[QEMU](http://www.qemu.org/) (GPLv2) – for virtualization
* [Visual Studio Code](https://github.com/Microsoft/vscode) (MIT) - Plugins: [Arduino](https://marketplace.visualstudio.com/items?itemName=vsciot-vscode.vscode-arduino), [Draw.io integration](https://marketplace.visualstudio.com/items?itemName=hediet.vscode-drawio), [indent-rainbow](https://marketplace.visualstudio.com/items?itemName=oderwat.indent-rainbow), [gitlens](https://marketplace.visualstudio.com/items?itemName=eamodio.gitlens), [shellcheck](https://marketplace.visualstudio.com/items?itemName=timonwong.shellcheck)
* [youtube-dl](https://rg3.github.io/youtube-dl/) (The Unlicense) - video/audio downloader
### Windows only
* [AIDA64 (8.20)](https://download.aida64.com/aida64business820.zip) (proprietary) – To get system specs, temps - [Check here for newer version](https://aida64.co.uk/download)
* [Chocolatey](https://chocolatey.org/) (MIT) - A package manager
* [CrystalDiskInfo](https://crystalmark.info/download/index-e.html) (MIT) - Monitoring tool for your drives and temperatures of your HW
* [Everything](https://www.voidtools.com/) (proprietary) - Tool for searching your files and folders
* [HashCheck](http://code.kliu.org/hashcheck/) (BSD-style) - Add hash sum feature to the Properties tab of files
* [MSI afterburner](https://www.msi.com/page/afterburner) (proprietary) + [Kombustor](http://www.ozone3d.net/msi_kombustor/) (proprietary) – for GPU stressing, overclocking and checking on temperatures
* [Rufus](https://rufus.akeo.ie/) (GPLv3+) – To create bootable flash drives when I’m stuck with Windows.
* [ShareX](https://getsharex.com/) (GPLv3) - screenshotting, capturing video, editing screenshots
* [WinAuth](https://winauth.com/) (GPLv3)- 2-factor-authentication, has integration for custom 2FA like Steam, Battle.net, ...
* [WinDirStat](https://windirstat.net/) (GPLv2) - Tool for visualizing your disk space to help you clean useless stuff
### Linux only
* [ANGRYsearch](https://github.com/DoTheEvo/ANGRYsearch) (GPLv2) - Tool for searching your files and folders
* [Flameshot](https://github.com/lupoDharkael/flameshot/) (GPLv3) - Screenshot tool, lets you draw over the screenshot while taking it.
* [gparted](http://gparted.org) (GPLv2+) - Partitioning tool. There is also a live image.
* [nano](https://www.nano-editor.org/download.php) (GPL) and [gedit](https://github.com/GNOME/gedit) (GPLv2) – For text editing since I’m too lazy to learn vim or emacs
* [pavucontrol](https://freedesktop.org/software/pulseaudio/pavucontrol/) (GPLv2) - sound mixer/audio control
* [QDirStat](https://github.com/shundhammer/qdirstat) (GPLv2) - Tool for visualizing your disk space to help you clean useless stuff
* [Tauon Music Box](https://github.com/Taiko2k/TauonMusicBox/) (GPLv3+) - My favorite music player
* [WINE](https://www.winehq.org/) (LGPLv2.1+) - Windows compatibility layer - play Windows games/use Windows software
## Android
* [AdAway](https://github.com/AdAway/AdAway) (GPLv3) - Blocks ads system wide, requires root
* [DriveDroid](https://play.google.com/store/apps/details?id=com.softwarebakery.drivedroid) (proprietary) - Boot images from your phone
* [FreeOTP](https://freeotp.github.io/) (Apache v2) - 2-factor-authentication, only has basic TOTP with no gimmicks
* [F-Droid](https://f-droid.org/) - Open source store with open source apps.
* [KeePassDX](https://github.com/Kunzisoft/KeePassDX) (GPLv3+) - Using it to access my password database. Using Nextcloud to sync it.
* [NewPipe](https://github.com/TeamNewPipe/NewPipe) (GPLv3) - Youtube player with all the features you could ask for
* [Nextcloud](https://nextcloud.com/) (AGPLv3) – For cloud backup and file sharing
* [Open Camera](https://play.google.com/store/apps/details?id=net.sourceforge.opencamera&hl=en) (GPLv3) - Camera app
* [Google services](http://opengapps.org/) (proprietary) - Gmail, account sync and such. I hope I can migrate all to Nextcloud sometime soon.
* [StreetComplete](https://github.com/westnordost/StreetComplete) - Help make OpenStreetMap better!
* ~~[Usb Mountr](https://github.com/Streetwalrus/android_usb_msd) (MIT) - Fakes mass storage so you can boot an image from your phone instead of using a flash drive. Requires root.~~
* [WiFiAnalyzer](https://play.google.com/store/apps/details?id=com.vrem.wifianalyzer&hl=en) (GPLv3) - Neat tool that shows APs, their settings and their signal strength. Doesn't show whether WPS is locked or not(Android API limitation).
## Browser addons
* Augmented Steam (GPLv3) - [Chromium](https://chrome.google.com/webstore/detail/dnhpnfgdlenaccegplpojghhmaamnnfp), [Firefox](https://addons.mozilla.org/en-US/firefox/addon/enhanced-steam-an-itad-fork) - Makes the steam website stuck less
* Auto Resume Downloads (MIT) - [Chromium](https://chrome.google.com/webstore/detail/auto-resume-downloads/pifbhionjpacnpjoaomhdpbekkdphdgd), [GitHub](https://github.com/Dongw1126/Auto-Resume-Downloads) - Automatically resume failed downloads, helpful on shoddy networks
* AutoScroll (MIT) - [Chromium](https://chrome.google.com/webstore/detail/autoscroll/occjjkgifpmdgodlplnacmkejpdionan) - Middle click to scroll, just like in Windows
* ClearURLs (LGPLv3) - [Chromium](https://chrome.google.com/webstore/detail/clearurls/lckanjgmijmafbedllaakclkaicjfmnk) [Firefox](https://addons.mozilla.org/firefox/addon/clearurls/) [GitHub](https://github.com/ClearURLs/Addon)- Remove tracking and other garbage from URLs
* Dark Reader (MIT) - [Chromium](https://chrome.google.com/webstore/detail/dark-reader/eimadpbcbfnmbkopoojfekhnkhdbieeh) [Firefox](https://addons.mozilla.org/en-US/firefox/addon/darkreader/) [GitHub](https://github.com/darkreader/darkreader) - Dark mode for the web, slightly buggy sometimes
* EditThisCookie (GPLv3+) - [Chromium](https://chrome.google.com/webstore/detail/editthiscookie/fngmhnnpilhplaeedifhccceomclgfbg) - Cookie editor
* Floccus (MPLv2)- [GitHub](https://github.com/marcelklehr/floccus) - Sync my bookmarks across browsers from my Nextcloud server
* Forever Pinned (proprietary, source code available) - [Chromium](https://chrome.google.com/webstore/detail/forever-pinned/nigigpmchbpkjjgncmpiggfnikllldlh) - keep a set of tabs always pinned
* HoverZoom+ (MIT) - [Chromium](https://chrome.google.com/webstore/detail/hover-zoom%2B/pccckmaobkjjboncdfnnofkonhgpceea) - View video/images upon hover
* Netflix 1080p (MIT) - [Chromium](https://chrome.google.com/webstore/detail/netflix-1080p/cankofcoohmbhfpcemhmaaeennfbnmgp) [GitHub](https://github.com/truedread/netflix-1080p) - Play Netflix in 1080p and 5.1
* Plasma Integration (GPLv3) - [Chromium](https://chrome.google.com/webstore/detail/plasma-integration/cimiefiiaegbelhefglklhhakcgmhkai) - For Plasma on Linux
* Reddit Enhancement Suite (GPLv3) - [Chromium](https://chrome.google.com/webstore/detail/reddit-enhancement-suite/kbmfpngjjgdllneeigpgjifpgocmfgmb) - Make Reddit bearable
* SponsorBlock (GPLv3) - [Chromium](https://chrome.google.com/webstore/detail/mnjggcdmjocbbbhaepdhchncahnbgone) [Firefox](https://addons.mozilla.org/addon/sponsorblock/) [GitHub](https://github.com/ajayyy/SponsorBlock) - Skip specific segments on Youtube
* SSL Grade (GPLv3) -[Chromium](https://chrome.google.com/webstore/detail/ssl-grade/mnebjincbemnakfbiefcipmbjijgaimp) - Test website's TLS settings on ssllabs and show their grade
* Steam Database (BSD-3) - [Chromium](https://chrome.google.com/webstore/detail/kdbmhfkmnlmbkgbabkdealhhbfhlmmon) [Firefox](https://addons.mozilla.org/en-US/firefox/addon/steam-database/) [GitHub](https://github.com/SteamDatabase/BrowserExtension) - Show links to SteamDB on Steam store pages
* Tamper Monkey (proprietary, source code available only for ancient versions, TODO: Check out Greasemonkey) - [Chromium](https://chrome.google.com/webstore/detail/tampermonkey/dhdgffkkebhmkfjojejmpbldmpobfkfo) - Run various scripts
* [GitHub unroll comments](https://greasyfork.org/scripts/400462-git-hub-unroll-comments/code/Git%20Hub%20-%20Unroll%20comments.user.js)
* [IPT fixes](https://git.rory.no/trgwii/IPT_Fixes/raw/branch/master/dist/IPT.user.js)
* [MuseScore downloader](https://github.com/Xmader/musescore-downloader/)
* [ScoreSaberEnhanced](https://github.com/trgwii/ScoreSaberEnhanced/raw/master/scoresaber.user.js)
* [Youtube continue watching](https://smitop.com/no-yt-continue-watching.user.js) - Autoclicks this stupid popup
* uBlock Origin (GPLv3) - [Chromium](https://chrome.google.com/webstore/detail/ublock-origin/cjpalhdlnbpafiamejdnhcphjbkeiagm), [Firefox](https://addons.mozilla.org/cs/firefox/addon/ublock-origin/) - Block ads, popups and similar stuff.
* Make sure to enable extra filters:
* Options -> Filter Lists -> Ads -> Adblock Warning removal list
* Options -> Filter Lists -> Annoyances -> Fanboy’s Annoyance
* User agent switcher (MPLv2) - [GitHub](https://github.com/ray-lothian/UserAgent-Switcher) - Switch UA to make sites display content I want
# Contact
If you wish to contact me, you can do so at following places:
* Email (and Google Chat) - spleefer90@gmail.com
* Matrix([Riot](https://riot.im/app)) - @C0rn3j:matrix.org - Am rarely active there
* Steam - [C0rn3j](https://steamcommunity.com/id/c0rn3j/)
* Telegram - [@C0rn3j](https://t.me/C0rn3j)
You will get the fastest response via Telegram and email.
SSH pubkeys (these are here mostly for myself):
```
ssh-ed25519 AAAAC3NzaC1lZDI1NTE5AAAAILhC+Jgu/ZCOYVYT9UfMqfWW+WXkqApXPXMKP2rcWnBj [2025-05-26]|ansible
ssh-ed25519 AAAAC3NzaC1lZDI1NTE5AAAAIH2YnZYygUhQBLS0xdQ2/Zlg2/QtSJoasj5aDcUvK0pj [2025-05-26]|c0rn3j
ssh-ed25519 AAAAC3NzaC1lZDI1NTE5AAAAIIqnWQRCGgb6YDcbENshr2ElhDa82aGqYGT9kZ+EHqkc u0_a184@Xiaomi12
```
GPG keys:
```
0x8EC3D1684C633793
```
# Hardware
List of all the hardware I'm using and what I'm using it for.
Also has stuff of others that I want to keep track of.
# Mine
## Networking
* Xiaomi Redmi AX6S RB03 - Router flashed with OpenWRT [FW](https://firmware-selector.openwrt.org/?target=mediatek%2Fmt7622&id=xiaomi_redmi-router-ax6s), [Device table](https://openwrt.org/toh/xiaomi/ax3200)
* TP-Link Archer C7 v2 - Router, flashed with OpenWRT [FW](https://firmware-selector.openwrt.org/?target=ath79%2Fgeneric&id=tplink_archer-c7-v2), [Device table](https://openwrt.org/toh/hwdata/tp-link/tp-link_archer_c7_ac1750_v2.0)
* TP-Link TD-W9980B - VDSL modem/router, flashed with OpenWRT (for W8980) [FW](https://firmware-selector.openwrt.org/?target=lantiq%2Fxrx200&id=tplink_tdw8980), [Device table](https://openwrt.org/toh/hwdata/tp-link/tp-link_td-w9980)
* D-Link - DGS-1100-08 - [FW (B1 version)](http://support.dlink.com/ProductInfo.aspx?m=DGS-1100-08)
* D-Link - DGS-1100-05 - [FW (B1 version)](http://support.dlink.com/ProductInfo.aspx?m=DGS-1100-05)
* Zyxel VMG3625-T50B - ADSL2/VDSL2 modem/router - [FW](https://www.zyxel.com/global/en/support/download?model=vmg3625-t50b)
* TL-WN722N v2(?) - 2.4GHz b/g/n USB adapter, works well with pentesting tools
## Peripherals and Other
* BOSCH D-TECT 120 Professional - Expensive tool for detecting things in the walls to avoid even more expensive mistakes
* Split unit AC - Indoor VIVAX ACP-12CH35AEHI/I+ (with EU-OSK105 for Wi-Fi), Outdoor VIVAX ACP-12CH35AEHI/O+
* Dead AC - Indoor Toshiba RAS-B10J2KVG-E
* 12000 BTU portable AC - Gree GPC12AL-K3NNA1A - Cause otherwise I'd be cooked alive in here during summer.
* Corsair XENEON 27QHD240 - 240Hz, 1440p, 27", OLED - Main screen [Firmware update](https://www.corsair.com/ww/en/p/monitors/cm-9030002-au/xeneon-27qhd240-27-inch-oled-2560x14400-240hz-gaming-display-cm-9030002-au#tab-downloads)
* ASUS MG279Q - 144Hz, 1440p, 27", IPS - Secondary screen
* ACER XB270HAbprz - 144Hz, 1080p, 27", TN - Main screen for secondary PC
* Genius SW-J2.1 1200 - 2.1 speakers. They sound alright.
* Idobao x YMDK ID75 - Fancy ortholinear 75% mechanical keyboard with FOSS firmware [FW](https://gitlab.com/C0rn3j/qmk-keyboards/-/tree/main/ymdk/id75)
* A4TECH XL-750BK - Laser mouse with 1000Hz polling rate and 3600 DPI, good enough for my needs, keeping it until it dies, then it's P93s only.
* 2x A4TECH Bloody P93, 1x J95 - Laser mice with 1000Hz polling rate and 3000(up to 5K) DPI, good enough for my needs. Also has extensive macro support and RGB lights.
* 3x Steam Controller - the only controller that works without hassle on all OSs, especially Linux
* Wacom Intuos Pen Small (CTL-480)
* 2x Korad KA3005P - Lab PSU
* WH-1000XM5 - BT Headset
* HyperX Cloud 2 - Headset - modified sound card to support USB-C instead of being soldered [FW](https://support.hyperx.com/Headsets/Cloud-II/)
* Brother PT-D600 - Label printer [FW & SW](https://support.brother.com/g/b/downloadlist.aspx?c=us_ot&lang=en&prod=d600eus&os=10011). Last 9 characters of serial number: C8Z952846 (Downloads and installs are locked behind it)
* Alternatively try [6.3.001](https://download.brother.com/pub/com/ptouch-su/editor/pew63001.exe) or [6.5.000](https://download.brother.com/pub/com/ptouch-su/editor/pew65000.exe) or different download server [6.3.001](https://update-akamai.brother.co.jp/ES/PP-PTEDIT6_ALL_ALL_631.EXE) or [6.5.000](https://update-akamai.brother.co.jp/ES/PP-PTEDIT6_ALL_ALL_650.EXE)
* `curl -H 'User-Agent: os/windows appName/P-touch Editor 6.5.0.0' 'https://p-touch.brother.com/es-contents/dlc/v11/bilsvc/categoryList?contentType=Template&langId=ENU&defaultLangId=ENU&paperType=Label&market=PT-HomeOffice'`
* `curl -H 'User-Agent: P-touch Editor 6.5.0.0' -H 'Content-Type: text/xml; charset=utf-8' -X POST https://firmverup.brother.co.jp/KNE_ES_UPDATE_SSL/es_update.asmx/verCheck -d '0Brother PT-D600ALL_ALL'`
* `curl -H 'User-Agent: P-touch Editor 6.5.0.0' -H 'Content-Type: text/xml; charset=utf-8' -X POST https://firmverup.brother.co.jp/KNE_ES_UPDATE_SSL/es_update.asmx/fileUpdate -d '0Brother PT-D600ALL_ALLBrother PT-D600PP-PTEDIT66.5.0.021'`
* FUNC KB-460 Cherry MX Blue - Mechanical keyboard
* HyperX Cloud Alpha - Buy HyperX Cloud 2 instead, the only advantage this has is detachable cable, but you need ear pads from the old ones and get no USB sound card
* Kindle Paperwhite 4 32GB - Jailbroken e-reader [Firmware update](https://www.amazon.com/gp/help/customer/display.html?nodeId=G54HPVAW86CHYHKS) [Software updates](https://www.mobileread.com/forums/showthread.php?t=225030) [KOReader(kindlepw2)](https://github.com/koreader/koreader/releases)
* Install latest JB hotfix first!
* ;log mrpi after installing mrpi and dropping new packages in the folder
* 55" OLED 4K@120 Philips TV (55OLED718) VESA mounted with SQM3642
* Soundbar TAB8507B
* Yamaha P-125 with LP-1 and L-125 stand (all black)
* KELLY's Madman 50 Black Green 29"(19) - [A bike](http://www.kellys-bike.cz/KELLYS-Madman-50-Black-Green-2019-d1920.htm)
* Wenger Pegasus 17" - Laptop Backpack
* Rowenta CV5831F0 - Hair dryer
* Xiaomi Mi Dual Driver Earphones (Type-C) Black - Wired earphones
* AlzaPower Q100 Quick Charge 3.0 Black - power brick
* AlzaPower Source 16000mAh Quick Charge 3.0 - powerbank
* Xiaomi Power Bank 16000mAh - old powerbank
* TS80 - Soldering iron [OEM firmware](http://www.minidso.com/forum.php?mod=viewthread&tid=3208) [Custom firmware(TS80_EN.hex)](https://github.com/Ralim/IronOS/releases)
* Mi Band 6 - Fitness tracker - Mostly for notifications and MPRIS control via KDEConnect
* PS3 Slim - jailbroken
* Valve Index - VR
* BlitzWolf BW-SHP6 15A - IoT 230V electric socket [Custom firmware](https://github.com/arendst/Tasmota/releases)
* TUSON Basic 80W - Glue gun
* KOKKEDAL chairs from JYSK (3601324)
* STRAFE RGB Mechanical Gaming Keyboard — Cherry MX Silent - Spare keyboard at this point
* IKEA [BJÖRKÅN](https://www.ikea.com/cz/cs/p/bjoerkan-umyvadlo-00468149/) + [NYSJÖN](https://www.ikea.com/cz/cs/p/nysjoen-umyv-skrinka-bila-60470408/) + [REIHE TERMO 11-CR](https://reihe.pl/pl/p/TERMO-11-CH-bateria-umywalkowa-termostatyczna-chrom/233) - Sink, undersink and thermostatic tap
* IKEA [VALLAMOSSE](https://www.ikea.com/cz/en/p/vallamosse-thermostatic-shower-mixer-chrome-plated-10349655/) for a thermostatic shower mixer
* Security keys: GoTrust Idem Key, YubiKey 5 NFC, YubiKey 5C NFC
## PC
* Corsair 450D Obsidian Series
* X670 AORUS ELITE AX rev 1.0 - [UEFI update](https://www.gigabyte.com/Motherboard/X670-AORUS-ELITE-AX-rev-10-12/support#Support-Bios)
* MSI MEG Ai1300P PCIE5
* AMD Ryzen 7 9700X + Noctua NH-D15 AM4 with back fan swapped for NOCTUA NF-F12 PWM Chromax Black Swap which is 120mm instead of 140mm due to RAM clearance
* GIGABYTE GeForce RTX 4090 GAMING OC 24G
* Intel 760p 1TB - [Firmware update](https://downloadcenter.intel.com/product/134580/Intel-SSD-760p-Series-1-024TB-M-2-80mm-PCIe-3-1-x4-3D2-TLC-)
* Apacer AS2280P4U Pro 2TB
* Kingston FURY Renegade NVMe 4TB - [Firmware update](https://www.kingston.com/en/support/technical/ksm-firmware-update)
* 3TB WD RED
* 2x 6TB WD BLUE
* 2x 8TB WD Elements Desktop
* Kingston FURY Beast Black 64GB (2x 32GB) DDR5 5600MHz - KF556C40BBK2-64
* STW-3125 - front panel with 3x 5Gbit USB-A, 1x USB-C and lots of cards slots
* VP1200ELCD - 720W UPS
## PC
* Corsair Carbide Series 200R
* Gigabyte GA-AX370-Gaming K5 - [UEFI update](https://www.gigabyte.com/Motherboard/GA-AX370-Gaming-K5-rev-1x/support#support-dl-bios)
* Evga G3 750
* AMD Ryzen 5 3600 + NOCTUA NH-D14
* MSI GeForce GTX 1080Ti GAMING 11G
* ADATA SX8200 Pro 1TB
* 525GB MX300
* 3TB WD RED (dying)
* G.SKILL 2x16GB DDR4 3200MHz CL14 Trident Z - F4-3200C14D-32GTZ
* TRUST TYTAN 2.1 Speaker 19019-04
## Laptop
* Lenovo Legion 5 Pro (16ACH6H-82JQ) - [UEFI update](https://pcsupport.lenovo.com/cz/en/products/laptops-and-netbooks/legion-series/legion-5-pro-16ach6h/82jq/82jq00c3ck/)
* Ryzen 7 5800H
* Micron SO-DIMM 32GB KIT DDR4 2300MHz CL22 (2x16GB)
* NVIDIA GeForce RTX 3060
* AMD Radeon RX Vega 8
* 1TB SSD SKHynix HFS001TDE9X084N
* Intel AX200 802.11ax (replaced a buggy Realtek chip)
* 16" - 2560x1600@165
## Laptop
* DELL Vostro 3560 (0C05GV) - [UEFI update](https://www.dell.com/support/home/us/en/04/product-support/servicetag/crzghv1/drivers)
* i7-3612QM
* Corsair SO-DIMM 16GB KIT DDR3L 1600MHz CL9 Vengeance (2x8GB)
* AMD Radeon HD 7670M
* Intel(R) HD Graphics 4000
* 500GB 860 EVO
* 120GB 840 EVO
* Intel® Dual Band Wireless-AC 3160
* 15.6" - 1920x1080
## Phones & Tablets
* Samsung S5 mini (kminilte[G800F])
* Xperia Z (yuga[C6603])
* Xiaomi Redmi 3S (land)
* Xiaomi Mi 9T (davinci[128GB, EEA]) [ROM update](https://forum.xda-developers.com/mi-9t/how-to/guide-ota-updates-stock-recovery-t3975027) [TWRP](https://eu.dl.twrp.me/davinci/)
* Xiaomi 12 (cupid) - [Lineage GSM by Arian](https://miracle.girlswithout.top/arian/lineage-21/cupid/) - TODO - reinstall to Arian's Vanilla and add MindTheGapps instead
* `adb reboot recovery`
* `adb sideload ~/Downloads/lineage-21.0-20240728-UNOFFICIAL-GMS-cupid.zip` from VOL UP sideload menu
* `adb push ~/Downloads/lineage-21.0-20240728-UNOFFICIAL-GMS-cupid-boot.zip /sdcard` - install Magisk.apk, launch it, patch this file
* `adb pull /sdcard/Download/magisk_patched-27000_8xwih.img` copy it back to desktop
* `adb reboot fastboot`
* `fastboot flash boot_a magisk_patched-27000_8xwih.img` + `fastboot flash boot_b magisk_patched-27000_8xwih.img`
* Lenovo Tab K10 (TB-X6C6F_EEA) - [ROM update (arm64_bgN)](https://sourceforge.net/projects/andyyan-gsi/files/lineage-21-td/) - [GSI Wiki entry](https://github.com/phhusson/treble_experimentations/wiki/Lenovo-Tab-K10)
* `7z e ~/Downloads/lineage-21.0-20240424-UNOFFICIAL-arm64_bgN.img.xz`
* `adb reboot fastboot`
* `fastboot flash system ~/Downloads/lineage-21.0-20240424-UNOFFICIAL-arm64_bgN.img`
## Raspberry Pi 5 8GB
* Arch Linux ARM, behind the TV running Kodi connected to Jellyfin, gets HDR with the GBM backend
* Terrible RTL9210 USB NVMe enclosure - [Firmware update](https://www.station-drivers.com/index.php/en/component/remository/Drivers/Realtek/Enclosures-Nvme-USB-3.1-3.2-4.x/NVMe-USB-3.1-USB-3.2/orderby,4/lang,en-gb/)
* ADATA SX8200 Pro 2TB
## Spares
* FLATRON W2243S - 60Hz overclockable to 74Hz, 1080p, TN, 22" ish
* Raspberry Pi 3 model B
* 2TB external drive (offline backups)
* 256GB M.2 2280 NVMe SSD - MVZLW256HEHP-000H1
* another external drive (unused)
* ASRock B450 Pro4 - [UEFI update](https://www.asrock.com/MB/AMD/B450%20Pro4/index.asp#BIOS)
* Realtek RTL8852AE 802.11ax
* AMD Stock cooler - Wraith Stealth
* AK-PCCM2P-05 PCIe adapter
* MHPower MS9-12 (12V 9Ah)
* Corsair RM650
* MSI Radeon RX 580 ARMOR 8G OC
* AMD Ryzen 5 7600X
## Puzzles
* 2x2 Meilong
* 2x2 YJ MGC
* 3x3 Meilong
* 3x3 Meilong 3C
* 3x3 Meilong M
* 3x3 MoYu RS3M 2020
* 4x4 Meilong
* 4x4 YJ YuSu V2 M
* 5x5 Meilong
* 5x5 QiYi MS - Logo removable by ethanol
* 6x6 YJ Yushi V2 M
* 7x7 YJ Yufu V2 M
* Megaminx YJ Yuhu V2 M
* Square-1 Meilong
* 3x3 Meilong Mirror (silver)
* 3x3 Qiyi Axis - Logo removable by ethanol (but ever so slightly damages the texture)
* 3x3 Qiyi Fisher - Logo removable by ethanol (but ever so slightly damages the texture)
* 3x3 Yj Windmill
* 4x4 Fanxin Axis
* 4x4 Fanxin Fisher
* 4x4 Fanxin Windmill
## 3D Printers
### Ender 3 V2
#### Cura settings
Start G-code:
```js
; Ender 3 Custom Start G-code
; Heat up the bed and extruder at the same time, saves time, the power supply can handle it
M104 S{material_print_temperature_layer_0} ; Start heating extruder
M140 S{material_bed_temperature_layer_0} ; Start heating bed
M109 S{material_print_temperature_layer_0} ; Wait for extruder to reach temp before proceeding
M190 S{material_bed_temperature_layer_0} ; Wait for bed to reach temp before proceeding
G92 E0 ; Reset Extruder
G28 ; Home all axes
;G29 ; Mesh leveling (takes a while)
;M500 ; Save mesh
M420 S1 ; Load saved mesh
G1 Z2.0 F3000 ; Move Z Axis up little to prevent scratching of Heat Bed
G1 X0.1 Y20 Z0.3 F5000.0 ; Move to start position
G1 X0.1 Y200.0 Z0.3 F1500.0 E15 ; Draw the first line
G1 X0.4 Y200.0 Z0.3 F5000.0 ; Move to side a little
G1 X0.4 Y20 Z0.3 F1500.0 E30 ; Draw the second line
G92 E0 ; Reset Extruder
G1 Z2.0 F3000 ; Move Z Axis up little to prevent scratching of Heat Bed
G1 X5 Y20 Z0.3 F5000.0 ; Move over to prevent blob squish
```
End G-Code:
```js
G91 ; Relative positioning
G1 E-2 F2700 ; Retract a bit
G1 E-2 Z0.2 F2400 ; Retract and raise Z
G1 X5 Y5 F3000 ; Wipe out
G1 Z10 ; Raise Z more
G90 ; Absolute positioning
G1 X0 Y{machine_depth} ; Present print
M106 S0 ; Turn-off fan
M104 S0 ; Turn-off hotend
M140 S0 ; Turn-off bed
M84 X Y E ; Disable all steppers but Z
```
##### Filament specific settings
* 2021-12 Ender 1.75mm filament
* 60°C bed just doesn't stick, 70°C seems to cause warping, 65°~ seems to be the sweet spot
* 190°C-200°C filament seems to have decent quality
#### Printer itself
v4.2.2 mainboard
Upgrades:
* CR Touch
* 8x20mm replacement bed springs
* [Landscape LCD mount](https://www.thingiverse.com/thing:4969671)
Tools:
* Feeler gauge
Firmware:
* Marlin 2.1.x-bugfix [2023-12-31]
* Built using STM32F103RET6_creality environment, changes from stock noted below:
* Configuration_adv.h
* `PROBE_OFFSET_WIZARD` defined - *Add a Probe Z Offset calibration option to the LCD menu*
* `BOOTSCREEN_TIMEOUT` changed from `3000` to `1500 - *(ms) Total Duration to display the boot screen(s)*
* Configuration.h
* `BLTOUCH` defined - *I own CR-Touch, so enable it*
* `PROBE_MANUALLY` commented out - *Because we define `BLTOUCH`*
* `USE_PROBE_FOR_Z_HOMING` defined - *Force the use of the probe for Z-axis homing*
* `Z_MIN_PROBE_USES_Z_MIN_ENDSTOP_PIN` commented out - *Enable this option for a probe connected to the Z-MIN pin*
* `Z_SAFE_HOMING` defined - *Use "Z Safe Homing" to avoid homing with a Z probe outside the bed area.*
* `CUSTOM_MACHINE_NAME` changed from "Ender-3 V2" to "Former E3V2" - *Name displayed in the LCD "Ready" message and Info menu*
* `NOZZLE_TO_PROBE_OFFSET` changed from `{ 10, 10, 0 }` to `{ -47, -8, -1.5 }` - *Measured by caliper and Z probe wizard and repeated print attempts*
* `DWIN_MARLINUI_PORTRAIT` commented out
* `DWIN_MARLINUI_LANDSCAPE` defined
* `DEFAULT_AXIS_STEPS_PER_UNIT` changed from `{ 80, 80, 400, 93 }` to `{ 80, 80, 400, 100.5 }` - *Default Axis Steps Per Unit (linear=steps/mm, rotational=steps/°) - X, Y, Z [, I [, J [, K...]]], E0 [, E1[, E2...]]*
* My esteps need to be more than default, measured by manually printing out 100mm of filament, measuring the actual printed out length as M and using it in the following equation: `(100/M) x E_Steps = New E-Steps`*
* Marlin 2.0.9.3
* Built using STM32F103RET6_creality environment, changes from stock noted below:
* Configuration_adv.h
* LCD_SET_PROGRESS_MANUALLY defined
* SHOW_REMAINING_TIME defined
* PROBE_OFFSET_WIZARD defined
* Configuration.h
* BLTOUCH defined
* PROBE_MANUALLY commented out
* Z_MIN_PROBE_USES_Z_MIN_ENDSTOP_PIN commented out
* USE_PROBE_FOR_Z_HOMING defined
* AUTO_BED_LEVELING_BILINEAR defined - seems to be in stock? Check and remove if so
* Z_SAFE_HOMING defined
* CUSTOM_MACHINE_NAME set to have my nickname in it
* Change NOZZLE_TO_PROBE_OFFSET to { -47, -8, 0 }
* Varies wildly from [someone else's measurement](https://www.reddit.com/r/ender3v2/comments/rrhaw5/cr_touch_nozzle_to_probe_offset/hqinsgz/), why?
#### Marlin build instructions
https://marlinfw.org/docs/basics/auto_build_marlin.html
https://marlinfw.org/docs/basics/install_platformio_vscode.html
https://marlinfw.org/meta/download/
Grab latest stable or latest bugfix (see what's usually recommended at the time of flash), unzip and open its config folder, read that to download configurations too.
Relevant config for the Ender is in `config/examples/Creality/Ender-3 V2/CrealityV422` - copy the two header files from the MarlinUI subfolder to the main firmware folder under Marlin subfolder, overwriting the defaults.
Screen FW needs to be in sync with printer FW, update from 4096 sector VFAT fs `mkfs.vfat -S 4096 /dev/sdg`, see Marlin config folder for instructions.
Printer FW won't update from a 4096 sector FS, use defaults (16k).
### Elegoo Saturn
On the way!
# Others
* Huawei HG622u - DSL modem/router
* LG TV 55UH605V - 4K TV. Has dumb dimming that can only be disabled via IN START menu(IR code 20DFDF20 - password is 0413).
* Brother MFC-9340CDW - [Drivers](https://support.brother.com/g/b/downloadlist.aspx?c=cz&lang=cs&prod=mfc9340cdw_all&os=10013)
* Lenovo Yoga 7 2-in-1 16AKP10 (83JU0012CK)
* HP Envy 15" bq100nc x360 - [UEFI update](https://support.hp.com/us-en/drivers/selfservice/hp-envy-15-bq100-x360-convertible-pc/16851053/model/18269834?sku=2PH18EA)
* Philips LatteGo EP3246/70
# Services
# Public
* [Books](https://books.rys.pw) - Semi-public calibre-web instance of my entire digital library, guest is welcome.
* [BookStack](https://rys.pw) - This wiki
* [FreshRSS](https://rss.rys.pw) - RSS/Atom reader - Used to be tt-rss but the developer isn't the nicest human being
* [HasteBin](https://haste.rys.pw) - A pretty pastebin
* [PrivateBin](https://paste.rys.pw) - A secure pastebin
* [Jitsi Meet](https://meet.rys.pw) - Self-hosted Jitsi instance(Currently down)
* [SmokePing](https://ping.rys.pw) - Checks and graphs latency
* [Minecraft](https://rys.pw/Minecraft) - minecraft.rys.pw
* [Mumble](https://mumble.rys.pw) - Running a server for Mumble VOIP (murmur)
* [Speedtest](https://speedtest.rys.pw)- A speedtest on one my Scaleway VPSs. Limited to 200/200 and definitely not always reaching that, so take it with a grain of salt
* [IP detection](https://ip.rys.pw) - I was annoyed that most sites didn't show both your IPv4, IPv6 and local IPs, so I made my own. You can curl ipv6.rys.pw or ipv4.rys.pw to get a plaintext response with your IP.
* [Protocol decode tool](https://a4.rys.pw) - Made for my A4TECH mice
* [Text replacer](https://text.rys.pw) - Text Mechanic alternative
* [Radio](https://radio.rys.pw) - Tauon Music Box lets you broadcast, so sometimes I do so
* Syncplay - syncplay.rys.pw:8999 - a SyncPlay server
* [PS3 Game Update finder](https://bree.rys.pw/ps3/?titleid=BCES01118) - Because the other tools are unavailable nowadays
# Private
* [Keycloak](https://auth.rys.pw/auth) - Authentication service
* [Icinga](https://monitoring.rys.pw) - Monitoring of my services
* [Mail](https://mail.rys.pw/webmail) ([Administration](https://mail.rys.pw)) - So I can use this domain for email
* [Matomo](https://analytics.rys.pw) - FOSS Google Analytics
* [Nextcloud](https://cloud.rys.pw) - Hosted on my own hardware - for friends/family. Can be used for file hosting, contacts, video calling, listening to music etc.
* [Wekan](https://wekan.rys.pw) - TODO lists
# Commercial
* [Scaleway](https://scaleway.com/) - VPS
* [Private Internet Access](https://www.privateinternetaccess.com/pages/kinja-deals-2) - 99$/3 years VPN
* Netflix - Paying Turkish prices
* Youtube - for listening to music and watching/uploading videos
* Deezer - For ripping most music I can find through Deezloader Remix.
# RSS
This is a list of my feeds on https://rss.rys.pw that serves as a backup
* [Arch Linux: News](https://www.archlinux.org/news/)
* [Arch Linux: Releases](https://www.archlinux.org/download/)
* [Arch Linux Monthly Reports](https://monthly-reports.archlinux.page/index.xml)
* [BookStack releases](https://github.com/BookStackApp/BookStack/releases)
* [Cheat Engine releases](https://github.com/cheat-engine/cheat-engine/releases)
* [Dolphin-emu News](https://dolphin-emu.org/blog/)
* [dxvk releases](https://github.com/doitsujin/dxvk/releases)
* [Flatseal releases](https://github.com/tchx84/Flatseal/tags.atom)
* [Gamers Nexus](https://www.gamersnexus.net/news/feed)
* [GitLab releases](https://about.gitlab.com/all-releases.xml)
* [G Suite updates](http://googleappsupdates.blogspot.com/atom.xml)
* [http-server-upload releases](https://github.com/crycode-de/http-server-upload/releases)
* [Jitsi News](https://jitsi.org/news/)
* [jitsi-meet-electron releases](https://github.com/jitsi/jitsi-meet-electron/releases)
* [KeePassXC releases](https://keepassxc.org/blog/)
* [LineageOS](https://lineageos.org/feed.xml)
* [Linux releases](https://www.kernel.org/feeds/kdist.xml) - Filter out 'longterm' and 'linux-next'
* [LOOT releases](https://github.com/loot/loot/releases)
* [LXD releases](https://github.com/lxc/lxd/releases)
* [Marlin releases](https://github.com/MarlinFirmware/Marlin/releases)
* [Matomo releases](https://matomo.org/changelog/feed/)
* [Nextcloud releases](https://github.com/nextcloud/server/tags.atom)
* [OAuth2 Proxy](https://github.com/oauth2-proxy/oauth2-proxy/releases)
* [OpenWrt Releases](https://github.com/openwrt/openwrt/releases)
* [Phoronix](https://www.phoronix.com/)
* [PHP releases](https://php.net/releases/)
* [postmarketOS Blog](https://postmarketos.org/blog/)
* [python-deezer-py releases](https://pypi.org/rss/project/deezer-py/releases.xml)
* [python-elevenlabs releases](https://pypi.org/rss/project/elevenlabs/releases.xml)
* [python-hsaudiotag3k releases](https://pypi.org/rss/project/hsaudiotag3k/releases.xml)
* [python-jxlpy releases](https://pypi.org/rss/project/jxlpy/releases.xml)
* [RouterOS releases](https://mikrotik.com/current.rss)
* [sc-controller releases](https://github.com/Ryochan7/sc-controller/releases)
* [qdirstat releases](https://github.com/shundhammer/qdirstat/releases)
* [RPCS3 Blog](https://rpcs3.net/blog)
* [Synthesia releases](http://feeds.feedburner.com/SynthesiaNews)
* [Tasmota releases](https://github.com/arendst/Tasmota/releases)
* [TWRP News](https://twrp.me/)
* [WineHQ News](https://www.winehq.org/news/rss/)
* [xkcd.com](https://xkcd.com/)
# Monitoring
Monitoring commands for monitoring.rys.rs
TODO: Migrate to Ansible roles
```bash
'/usr/lib/monitoring-plugins/check_curl' '--hostname=a4.rys.rs' '--ssl=1.2+' '--string=Enter output' '--use-ipv4'
'/usr/lib/monitoring-plugins/check_curl' '--hostname=analytics.rys.pw' '--ssl=1.2+' '--string=Sign in - Matomo' '--use-ipv4'
'/usr/lib/monitoring-plugins/check_curl' '--hostname=auth.rys.rs' '--ssl=1.2+' '--string=Keycloak' '--url=/admin/master/console/' '--use-ipv4'
'/usr/lib/monitoring-plugins/check_curl' '--hostname=www.bloody.com' '--sni' '--ssl=1.2+' '--string=V2024.1115A_MUI' '--timeout=30' '--url=/en/product.php?pid=10&id=229&fid=16' '--use-ipv4'
'/usr/lib/monitoring-plugins/check_curl' '--expect=403' '--hostname=books.rys.rs' '--ssl=1.2+' '--string=Keycloak' '--use-ipv4'
'/usr/lib/monitoring-plugins/check_curl' '--hostname=cloud.rys.rs' '--ssl=1.2+' '--string=Corncloud' '--url=/login' '--use-ipv4'
'/usr/lib/monitoring-plugins/check_curl' '--hostname=haste.rys.pw' '--ssl=1.2+' '--string=Duplicate & Edit' '--use-ipv4'
'/usr/lib/monitoring-plugins/check_curl' '--hostname=ip.rys.rs' '--ssl=1.2+' '--string=Your IPv4' '--use-ipv4'
'/usr/lib/monitoring-plugins/check_imap' '--certificate=5,10' '--hostname=mail.rys.rs' '--port=993' '--use-ipv4'
'/usr/lib/monitoring-plugins/check_curl' '--hostname=mail.rys.rs' '--ssl=1.2+' '--string=login here' '--url=/login.php' '--use-ipv4'
'/usr/lib/monitoring-plugins/check_curl' '--hostname=mail.rys.rs' '--ssl=1.2+' '--string=Roundcube Webmail' '--url=/webmail/' '--use-ipv4'
'/usr/lib/monitoring-plugins/check_curl' '--hostname=mumble.rys.rs' '--use-ipv4'
# Missing???
'/usr/lib/monitoring-plugins/check_tcp' '--hostname' 'mumble.rys.pw' '--port' '64738'
'/usr/lib/monitoring-plugins/check_curl' '--hostname=paste.rys.pw' '--ssl=1.2+' '--string=zero knowledge' '--use-ipv4'
'/usr/lib/monitoring-plugins/check_curl' '--hostname=ping.rys.rs' '--ssl=1.2+' '--string=Network Latency' '--use-ipv4'
# Missing???
'/usr/lib/monitoring-plugins/check_http' '--hostname=radio.rys.pw' '--ssl=1.2+' '--string=Matomo'
'/usr/lib/monitoring-plugins/check_curl' '--hostname=rss.rys.rs' '--ssl=1.2+' '--string=Main stream · FreshRSS' '--url=/i/' '--use-ipv4'
'/usr/lib/monitoring-plugins/check_curl' '--hostname=rys.rs' '--ssl=1.2+' '--string=Hardware' '--url=/books/wiki/page/start' '--use-ipv4'
'/usr/lib/monitoring-plugins/check_curl' '--hostname=speedtest.rys.rs' '--ssl=1.2+' '--string=LibreSpeed' '--use-ipv4'
'/usr/lib/monitoring-plugins/check_tcp' '--hostname' 'syncplay.rys.rs' '--port' '8999'
# Missing?
'/usr/lib/monitoring-plugins/check_http' '--hostname=text.rys.pw' '--ssl=1.2+' '--string=AGPL'
'/usr/lib/monitoring-plugins/check_curl' '--hostname=wekan.rys.rs' '--ssl=1.2+' '--string=meteor_js' '--use-ipv4'
```
# Recipes
[https://rys.pw/recipes](https://rys.pw/books/recipes/page/recipes)
# Arch Linux
I use Arch Linux (or the spinoff ARM version) on practically all my machines.
### Download
You can [download Arch here](https://www.archlinux.org/download/)
### Basic commands and usage
Before going through the install guide you really should know these.
Lower/upper case is important in linux.
You can use arrow keys to navigate through your previous commands.
CTRL+ALT+F1-F12 - key combination for switching between terminals
cd DIRECTORY - for example cd /home/baf/Downloads - chooses directory
nano FILE - edit a text file
CTRL + C - break from a command, for example a ping
lsblk - lists all your drives and their partitions.
elinks - tool you can use to view webpages from the CLI
irssi - IRC in the CLI in case you get lost, #archlinux on Libera should help you out if you ask nicely.
### Installing GPU proprietary drivers
#### Nvidia
**_sudo nano /etc/pacman.conf_** - uncomment _[multilib]_ and the line below it. This is required for 32bit applications.
**_sudo pacman -Syu_** - synchronize the repository databases and update the system's packages
**sudo pacman -S nvidia nvidia-libgl lib32-nvidia-libgl nvidia-settings**
**reboot**
#### AMD
Do not use Catalyst. If you think you have to, rather get another GPU.
Table of hardware with needed drivers is [here](https://wiki.archlinux.org/index.php/Xorg#Driver_installation).
### Installing packages from AUR
You can download user created PKGBUILDs from the [AUR.](https://wiki.archlinux.org/index.php/Arch_User_Repository)
### Package managers
#### Pacman
Usage: `tldr pacman` + the rest of this page:
-S has a useful \-\-ignore _packagename_ flag, which lets you ignore a broken package when doing a full update for example. Use multiple times when you want to avoid installing more packages.
There's also a \-\-noconfirm flag, which ignores confirmation of actions.
**pacman -Qm** - List packages installed locally.(that includes AUR)
You can get to the package cache via this command **cd /var/cache/pacman/pkg/** and then use **pacman -U _packagename_** to downgrade/reinstall a package.
# Converting Wii's Bluetooth module to a USB dongle
[Original thread on Dolphin forums](https://forums.dolphin-emu.org/Thread-how-to-wire-a-wii-s-bluetooth-module-to-a-pc-usb-port)
[Video](https://www.youtube.com/watch?v=oV4hZxbOkXI)
This page assumes no previous soldering knowledge whatsoever.
If you want perfect connection of real Wii motes to the Dolphin emulator, you want to pass-through one of the original chips to Dolphin.
There are two chips, the older 4250A-WML-C43 and the newer J27H002. The only difference between those seems to be that the newer version has slightly smaller test pads, but they're pretty small on both versions, so it's not going to make your job too much easier by choosing one over the other.
[](https://rys.pw/uploads/images/gallery/2021-06/j27h002-4250a-wml-c43-bluetooth-module-board-for-nintendo-wii-replacement-part-jpg-640x640.png)
Both chips go for about $1.3 a pop on Aliexpress.
List of things you'll need for this -
* [BT chip](https://www.aliexpress.com/item/For-Nintendo-Wii-Bluetooth-Repair-Original-Used-J27H002-Bluetooth-Module-board-replacement/32979685940.html) ($1.3)
* [Multimeter](https://www.aliexpress.com/item/VC97-3-3-4-Auto-range-digital-multimeter-all-function-production/1471304711.html) ($22.5) - Optional, but highly encouraged to save your sanity
* [6cm Black and Red wires](https://www.aliexpress.com/item/100pcs-set-22AWG-Breadboard-Jumper-Cable-Wires-Kit-6cm-Fly-Jumper-Wire-Cable-Tin-Conductor-Wires/32952083569.html) ($0.8) - Ideally get black, red, white and green.
* [Soldering iron](https://www.aliexpress.com/item/Professional-Mini-5V-8W-LED-Indicator-USB-Powered-Welding-Soldering-Iron-Kit-Tools/32836714082.html) ($5)
* [Soldering stand with sponge](https://www.aliexpress.com/item/DIYWORK-Electric-Soldering-Iron-Stand-Holder-with-Welding-Cleaning-Sponge-Pads-Generic-High-Temperature-Resistance/32978454924.html) ($1.8)
* [0.6mm solder wire](https://www.aliexpress.com/item/Hight-Quality-High-Quality-Tin-lead-Rosin-Core-Solder-Wire-0-3mm-2-Flux-Reel-Welding/32729746766.html) ($1.6)
* [Shrink tubes](https://www.aliexpress.com/item/328-127-530-70-164PCS-Heat-Shrink-Tubing-Insulation-Polyolefin-2-1-8-Sizes-Colorful-Wrap/32831365952.html) ($2)
* [LD1117V33 Voltage regulator](https://www.aliexpress.com/item/10PCS-LD1117V33-TO-220-LD1117-3-3-TO220-free-shipping/32714864337.html) ($2.5)
* [USB-A connector](https://www.aliexpress.com/item/5X-Type-A-Plug-4-pin-Male-Adapter-USB-2-0-Solder-Connector-Black-Cover-Square/32868290245.html) ($1)
* [Solder flux](https://www.gme.cz/pajeci-kapalina-ne-30ml) ($2)
* [Third Hand](https://www.aliexpress.com/item/Helping-Third-Hand-Tool-Soldering-Stand-With-4X-Welding-Magnifying-Glass-led-Adjustable-2-Alligator-Clips/32983710939.html) ($5.7) - Optional but it'll make your life easier
* Glue gun, or electrical tape if you don't have one
* (The links are bound to die sooner or later, use the URL name to find equivalent)
When you're done and you get the USB dongle to show up when connected, follow the [Bluetooth Passthrough wiki page](https://wiki.dolphin-emu.org/index.php?title=Bluetooth_Passthrough).
I will not be wiring the sync button as you can just use the software button in Dolphin when connecting the Wii motes, so essentially just ignore the button on the following schematic. If you want it there you're free to wire it up of course.
[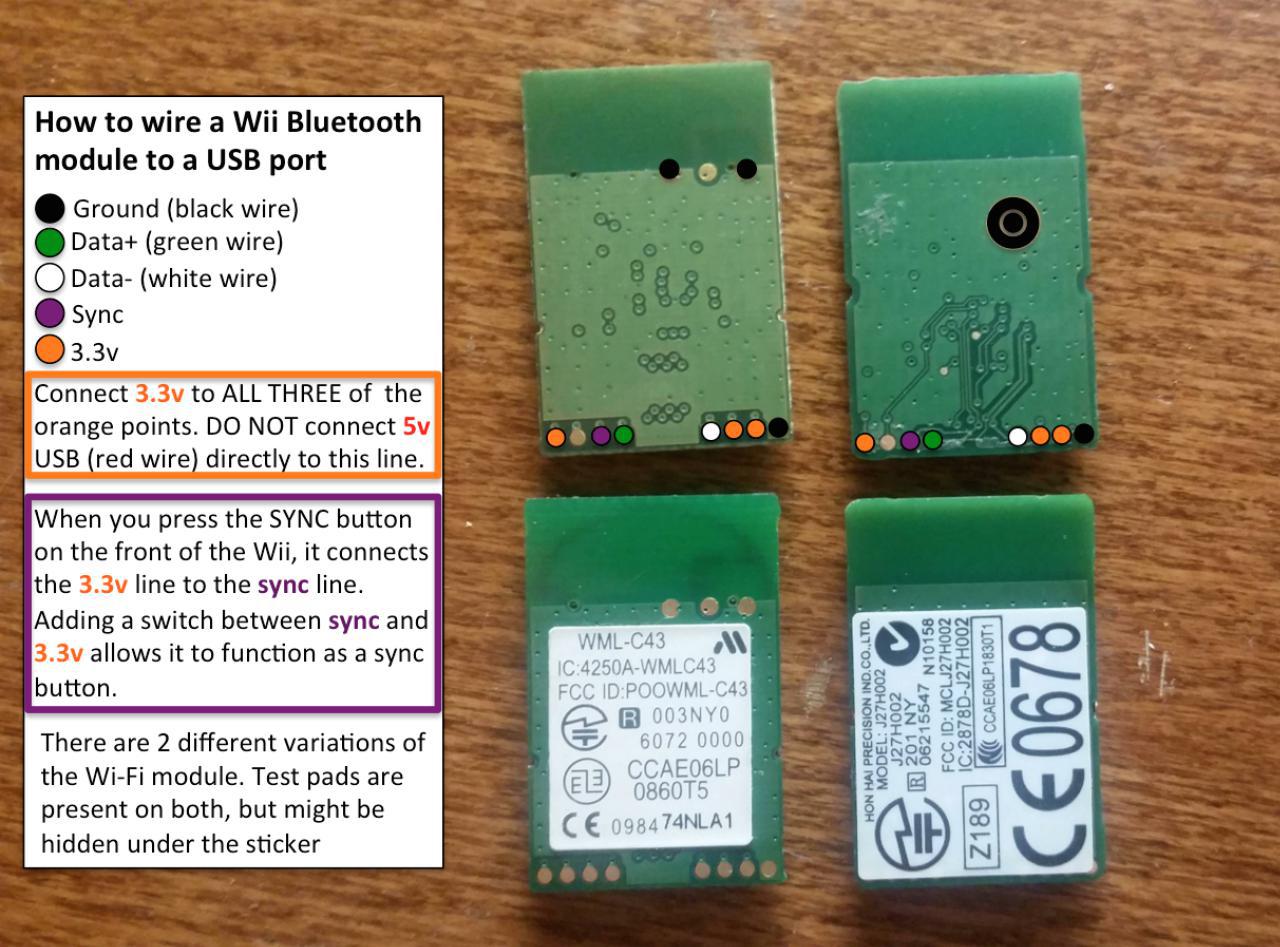](https://rys.pw/uploads/images/gallery/2021-06/dolphin-bt-chip-schema.jpg)
[](https://rys.pw/uploads/images/gallery/2021-06/wii-bt-full-schematic.jpg)
[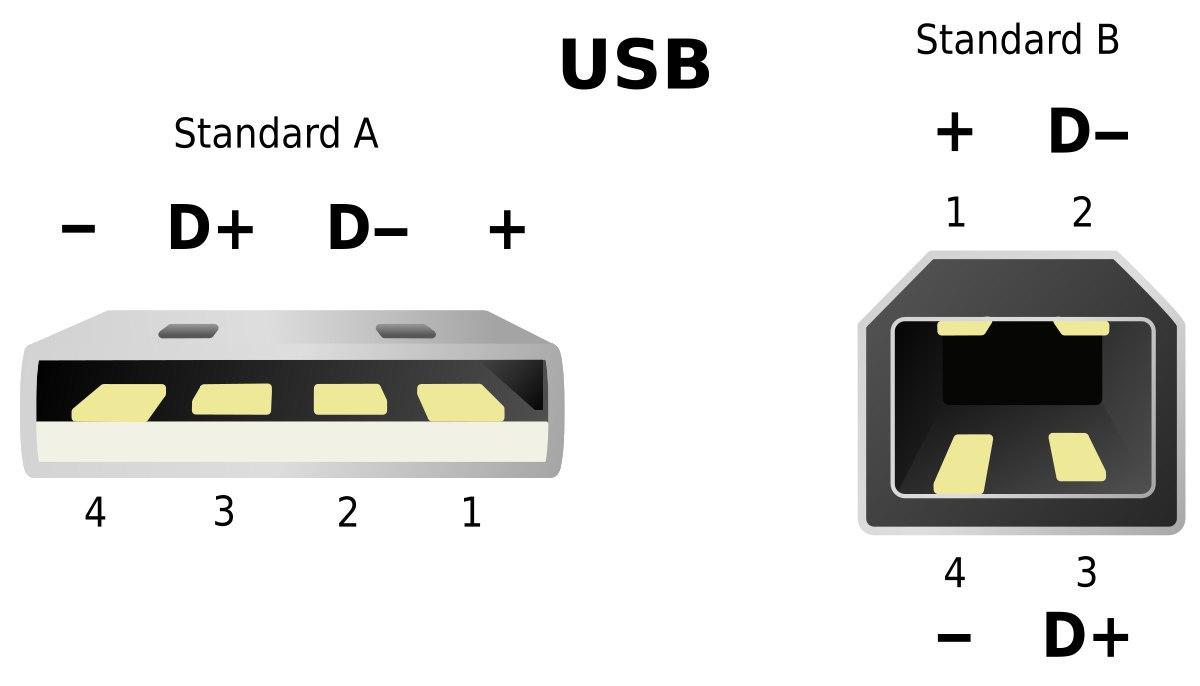](https://rys.pw/uploads/images/gallery/2021-06/usb-a-and-b-schematic.jpg)
1. Solder the 4 wires to the USB-A connector and pull the cables through the plastic cover. Red for +, black for -, green for Data+ and white for Data-
1. Continuity test - make sure none of the 4 pins is connected to its nearby pin(s) and that all pins are connected to the wires
1. Pull the plastic cover onto the USB connector hard so it stays in place
1. Put a shrink tube on USB(-) and pull another black wire through it, solder both to regulator GND. You should twist the wire ends together when soldering two at the same time
1. Take two red wires and solder them to regulator output, put a shrink tube on them
1. Put a shrink tube on USB(+) red wire and solder the wire to regulator input
1. Continuity test the 2 pairs of wires on the regulator
1. Pull the shrink tubes up and heat them under fire
1. If you're using liquid flux like I am, pour it on the pads , let it be the for a short while then dry it up (or don't dry it if your flux doesn't turn into charcoal when heated up like mine does)
1. If you don't have properly colored wires for Data+ and -, tontinuity test which wire is which and solder them onto the BT chip
1. The 2 output red wires are because there's 3 output pads total (orange) - you need to connect all 3 together. One wire goes to the singular left pad, and other wire goes between the 2 right pads and you bridge those together
1. Solder the remaining GND and you're done soldering
1. Clean your iron on the damp sponge, put some solder on the tip and turn it off. this prevents degrading the tip.
1. Test the dongle you made in a computer
1. Finally hot glue the connections on the BT chip so they don't come off in case they get tugged on hard
1. Put the connector on the USB dongle and hot glue it, hot glue the regulator from the other side
1. With a working adapter, follow Dolphin's [BT passthrough page](https://wiki.dolphin-emu.org/index.php?title=Bluetooth_Passthrough)
# Creating a bootable flashdrive
# NOTICE
## Nowadays, just use Ventoy.
---
---
---
To create a bootable flashdrive for Windows you'll need an 8GB+ flash drive. For Linux, it depends on the distribution. You should be fine with 1GB for Arch, but hey, 16GB flash drives are like $5 today.
Keep in mind that the flash drive can either be (U)EFI bootable, BIOS bootable(often named legacy in UEFI options) or both.
To actually boot from the flash drive, go into your UEFI/BIOS settings and either find the option to boot directly from the flash drive, or rearrange your boot order to boot from flash drive first.
## On Windows
### Linux or Windows images
**[Rufus](https://rufus.akeo.ie/)** - Rufus usually has no problem working with Linux and Windows ISOs and is easy to work with. The only negative thing is that I didn't figure out how to make ISOs that boot both under BIOS and UEFI, only one or the other, which is selected under the "Partition scheme" label.
You want to use "GPT for UEFI" partition scheme unless your hardware is years and years old.
unetbootin - Sometimes certain Linux distributions fail to be used by Rufus
## On Linux and macOS
macOS has some command name differences not mentioned here, but the general idea works still.
### Linux images
Unebootin or dd can be used for this purpose, I chose to use dd because it's preinstalled and straightforward.
Make sure to run lsblk to know what device you should be dealing with.
**umount /dev/sde1** - Unmount the device in case it's mounted
**sudo dd if=/path/to/file.iso of=/dev/sde bs=4M status=progress && sync**
You should now be able to boot the distribution in both BIOS and UEFI, if the distribution supports it.
---
### Windows images
Below is a description of the manual process, however you can use [WoeUSB](https://github.com/slacka/WoeUSB) for an automated one.
---
[[1]](http://onetransistor.blogspot.cz/2014/09/make-bootable-windows-usb-from-ubuntu.html) [[2]](http://softwarebakery.com/windows-install-on-drivedroid)
[This handy script](https://gitlab.com/C0rn3j/configs/-/blob/master/ansible/playbooks/roles/tools/files/corn-windows-bootable.sh) does the below-described process:
Format the flash drive with Gparted - Device > Create partition table - Set partition table to msdos. Afterwards create a FAT32 partition, remember to label it, labeling it is optional if you only want to keep only one OS on the flash drive but probably required for more.
Right click the partition you created > Manage flags > tick the 'boot' flag. Exit gparted.
Mount the ISO you want to use to some already existing folder
**sudo mount -o loop ~/Downloads/Win8.1_English_x64.iso /mnt/iso**
and copy all files from it to the mounted flash drive. The exclude is there to support Win10 1809+ images which have over 4GB install.wim which needs to be split:
**rsync -rv \-\-progress \-\-exclude=install.wim /mnt/iso/ /run/media/_c0rn3j/WINDOWS/_**
**wimsplit /mnt/iso/sources/install.wim /run/media/c0rn3j/WINDOWS/sources/install.swm 3000**
At this point the flash drive should be UEFI bootable. You're likely done here, but if you have a very old machine, the rest is needed to also enable BIOS booting.
Also you should create a file `ei.cfg` in the `sources` folder with following content(it makes sure you can actually select the edition):
```
[Channel]
Retail
```
**sudo grub-install \-\-target=i386-pc \-\-boot-directory=/run/media/_c0rn3j/WINDOWS_/boot /dev/_sdd_** - This command will install GRUB bootloader on the flash drive.
Last thing you'll need to do is create a config file for GRUB.
**gedit /run/media/_c0rn3j/WINDOWS_/boot/grub/grub.cfg** - This command will run gedit, paste the following text block in it and save it. Remove the label part if you didn't set one.
```
default=1
timeout=15
color_normal=light-cyan/dark-gray
menu_color_normal=black/light-cyan
menu_color_highlight=white/black
menuentry "Start Windows Installation" {
insmod ntfs
insmod search_label
search --no-floppy --set=root --label WINDOWS --hint hd0,msdos1
ntldr /bootmgr
boot
}
```
The flash drive should now be bootable by both UEFI and BIOS.
### KON-BOOT images
Format the flash drive with Gparted - Device > Create partition table - Set partition table to msdos. Afterwards create a FAT32 partition, remember to label it.
Copy the EFI folder onto the new partition.(you may need to rename it to lowercase efi?) Copy the files in USBFILES folder onto the new partition.
**sudo grub-install --target=i386-pc --boot-directory=/run/media/_c0rn3j/KONBOOT_/boot /dev/_sdd_** - This command will install GRUB bootloader on the flash drive.
**sudo cp /usr/lib/syslinux/bios/memdisk /run/media/c0rn3j/KONBOOT/boot/grub/** - copies memdisk onto the flashdrive - needed for BIOS booting.
**gedit /run/media/_c0rn3j/KONBOOT_/boot/grub/grub.cfg** - create the following grub entry
```
menuentry "Konboot" {
linux16 /boot/grub/memdisk
initrd16 /konboot.img
}
```
Note: Konboot v2.5 does not seem to work on anything past the first W10 RTM build.
# Using Android to emulate mass storage
You can boot images straight off your phone if you've root permissions.
[Usb Mountr](https://github.com/Streetwalrus/android_usb_msd) was one of the FOSS solutions, but it was dropped by the maintainer.
[DriveDroid](https://play.google.com/store/apps/details?id=com.softwarebakery.drivedroid&hl=en) is supported but proprietary.
Your kernel might support emulating USB, emulating CD drive or both.
# Dolphin
# Info
Dolphin is an emulator, community/dolphin-emu on Arch.
If you have real Wii motes: Dolphin uses its own drivers so do not install xwiimote or anything similar, do not use bluetooth GUI or anything, simply connect a bluetooth dongle and start the BT service via
sudo systemctl start bluetooth
if it isn't on already. Go to Controllers in dolphin-emu, set at least one Real Wiimote and check continuous scanning. On pressing 1+2 or the red sync button the controller should connect and vibrate.
All chinese BT dongles will likely not work properly, throwing various errors at you when you try to use them with Dolphin.
Note: The wii motes can glitch out - you will need to take out the batteries for a second to get them to connect again.
You need to add ISO directory with your game ISO files to do so go to Config > Paths > Add... and select the directory.
You may want to go to Graphics > Enhancements and set the resolution to auto and use some AA and/or Anisotropics Filtering.
You should also go to controllers and check that the GC/Wii controllers are configured(You can always reset them to default).
Dolphin-emu has an awesome feature called Netplay, allowing you to play the games with your friends over the internet even though the games were meant to be played locally only! For that you'll need to have the exact same Dolphin-emu version, exact same ISO file(check file hash to know you do) and same Memory card save if you intend to use that.
Sadly Netplay doesn't work with real Wiimotes(yet...).
# BT dongles
From my experience: some just don't work, some work weirdly, I'll try to list what I bought and where and how it works. None store-bought work truly well.
[Dongle #1](http://i.imgur.com/iJoD8qW.png) - Works weirdly but after messing around with it for a bit I got both my wii motes to connect. Would not recommend.
[Dongle #2](http://i.imgur.com/xf8nMrl.png) - Does **not** work with Dolphin.
Dongle #3 - works perfectly but I don't have an exact link, looks exactly like Dongle #2 but without any text on it or "golden" connector. Seems like it's USB 2.0 V2.0 BT dongle.
The only really functional option is to [make your own from a Wii BT chip](https://rys.pw/converting_wii's_bluetooth_module_to_a_usb_dongle)
# Games
# CS:GO
[CSGO_Game_Mode_Commands](https://developer.valvesoftware.com/wiki/CSGO_Game_Mode_Commands)
Figuring out wallbangs n stuff:
```bash
mp_buy_anywhere 1;mp_buytime 60000
mp_maxmoney 65535;mp_startmoney 65535;mp_afterroundmoney 65535
mp_roundtime_defuse 60;mp_roundtime_hostage 60;mp_roundtime 60;mp_restartgame 1
```
Danger zone bunny hop practice:
```bash
game_mode 0; game_type 2; map dz_sirocco
sv_cheats 1; sv_infinite_ammo 1; sv_regeneration_force_on 1
mp_autokick 0; mp_disable_autokick; bot_kick all
# MP (use changelevel instead of map above)
mp_respawn_on_death_ct 1; mp_respawn_on_death_t 1
exojump; give weapon_bumpmine; give weapon_knife
```
Crosshair(bad):
```
CSGO-F3pjS-84KDh-s7t54-W8m37-VVFyB
```
# Interesting resources
Punycode attack on browser URLs - [https://www.аррӏе.com/](https://www.аррӏе.com/)
[From 0x90 to 0x4c454554, a journey into exploitation](http://www.myne-us.com/2010/08/from-0x90-to-0x4c454554-journey-into.html)
[Email spoofing](https://www.reddit.com/r/sysadmin/comments/aph6ee/lets_talk_about_email_spoofing_and_prevention_alt/)
### Teaching
Stolen from a Reddit comment somewhere:
1. Test - before starting any topic, make sure your student has a grasp of the prerequisites by giving them simple tasks. Just because you have taught them the prerequisites a week ago does not mean that they didn't forget.
2. When you are teaching them, talk as little as possible. The only thing you should be saying is the concepts.
3. Ask lots of questions. I.e.: What is an object (expect them to repeat what you told them); What happens if (insert 10x different cases). Teach by asking.
I can't emphasize this enough. When I teach, I never say more than 2 sentences without asking a question. Because you quickly realize that people have a hard time retaining more than 2-3 sentences at a time.
4. Set 0 expectations. If you get frustrated it's because you have expectations. Many people have self confidence issues. Being disappointed will cause your students emotional stress and they will not be able to learn. They might start to avoid asking you questions...
5. Listen. Many times, your students could be saying what you wanted to hear, but worded differently. Their analogy could have the same concept as yours but very different. Learn to recognize what students are saying.
# Minecraft
From time to time I host a server for myself and a few friends, but new people are welcome too!
It's down most of the time.
## Info
* **IP**: minecraft.rys.pw
* **Default game directory**:
* Windows: C:\Users\YOURUSERNAME\AppData\Roaming\.minecraft (%APPDATA% in file explorer)
* Linux: ~/.minecraft
* You can launch .jar files on with "java -jar file.jar". Package with java is named "jre8-openjdk" on Arch and "openjdk-8-jre" on Ubuntu.
* **Pirated MC note**: You can use TLauncher to download the game if you do not have a paid account. There's account switch mod which lets you choose the username.
## Installation
* [Install 64-bit java](https://java.com/en/download/)
* **MultiMC** (must have paid account)
* [Install MultiMC](https://multimc.org/#Download)
* Set minimum and maximum RAM allocation to '16384 MB' after launching MultiMC
* Create a new 1.12.2 instance
* Edit it, install latest Forge in the Version tab
* Click View Folder in the Loader Mods tab - drop the [mods](https://cloud.rys.pw/s/wGzSxxc5sPZD8kq) in this folder
* **Manual** (not recommended)
* Download the game, forge and [mods](https://cloud.rys.pw/s/wGzSxxc5sPZD8kq)
* Copy the contents of the downloaded folder(Minecraft 1.12.2) to the default game directory
* Run Minecraft client, login, quit
* Run forge .jar and click OK (**Install the client version** which is selected by default)
* Run Minecraft client, click Edit Profile
* Select appropriate forge version under the Use Version column(they're at the bottom of the list)
* tick "JVM Arguments" checkbox and add/edit these parameters -Xms16G -Xmx16G
* Finally, if you're still having trouble, there's [an old video tutorial](https://www.youtube.com/watch?v=aFjQYzCL71M)
## Notes
Clear all items on the ground - /kill @e[type=Item]
[Where to get Forge](http://files.minecraftforge.net/)
[Main place to get mods](http://minecraft.curseforge.com/mc-mods?filter-game-version=&filter-sort=updated) rarely, some mods won't use Curseforge but a build server or a webpage (IC2 for example)
-Xms is startup memory and -Xmx is maximum allowed memory. **-Xms8G -Xmx8G** - makes minecraft start with 8GB and will let allocate memory up to 8GB as needed... This is useful as reallocation is costly so let's just go with max.
```
# Will install/update server + forge in the current directory.
java -jar forge-*-installer.jar --installServer
```
[Modlist](https://gitlab.com/C0rn3j/MCModUpdater/-/blob/master/modlist-mc.yaml)
[Server setup](https://gitlab.com/C0rn3j/OfflineMinecraft|here)
# Offensive
## Rubber Ducky
Screw the $45~ thing, we're making our own for $1.15~.
https://hackernoon.com/low-cost-usb-rubber-ducky-pen-test-tool-for-3-using-digispark-and-duck2spark-5d59afc1910
https://github.com/PlatyPew/Digispark-Duckduino
https://github.com/mame82/duck2spark
https://github.com/hak5darren/USB-Rubber-Ducky/wiki/Payloads
Open Arduino IDE; File -> Preferences -> Additional Boards Manager URLs
http://digistump.com/package_digistump_index.json
Tools -> Board -> Boards Manager -> Digistump AVR Boards - install it.
```bash
# cat > /etc/udev/rules.d/49-micronucleus.rules << EOF
SUBSYSTEMS=="usb", ATTRS{idVendor}=="16d0", ATTRS{idProduct}=="0753", MODE:="0666"
KERNEL=="ttyACM*", ATTRS{idVendor}=="16d0", ATTRS{idProduct}=="0753", MODE:="0666", ENV{ID_MM_DEVICE_IGNORE}="1"
EOF
reboot
```
You can now flash stuff to the board by selecting it as 'Digispark Default 16.5mhz'.
Do not plug the board before compiling process, do it after when you'll be prompted.
```
## This seems not needed anymore as the AVR package ships up to date micronucleus, and the project stopped providing precompiled linux library?
#git clone https://github.com/micronucleus/micronucleus.git
#cp ~/micronucleus/commandline/micronucleus /home/c0rn3j/.arduino15/packages/digistump/tools/micronucleus
```
## General
http://tools.kali.org/tools-listing
## Hashcat
Hashcat is a tool to crack various hashes, passwords and other formats. Hashcat is now merged into one OpenCL version(used to have a CUDA version for nvidia GPUs- CudaHashcat, the new hashcat only supports OpenCL).
For WPA2 it uses a new(2017) format called [hccapx](https://hashcat.net/cap2hccapx/).
## Attacking 802.11
[[1]](https://www.youtube.com/watch?v=_2EJkZfUM2g)
[[2]](https://www.youtube.com/watch?v=tzfcOAWQGU4)
[[3]](https://www.youtube.com/watch?v=6qKlpK_XRtg)
http://tools.kali.org/wireless-attacks/mdk3
### Preparation:
Packages: aircrack-ng wireshark-qt macchanger [reaver-wps-fork-t6x](https://github.com/t6x/reaver-wps-fork-t6x)
---
Kill your network manager service to avoid it interfering.
I am using NetworkManager.
**sudo systemctl stop NetworkManager** - sometimes it starts again so just try this twice...
Then use **sudo airmon-ng** to find out your interface name for the wireless card you want to use. If it is not listed, you are either lacking drivers or it is not compatible.
After finding out your interface name, turn your WLAN card into monitor mode with **sudo airmon-ng start _yourInterface_**, you will then have a **_yourInterface_mon** interface you can use. You can use the **–verbose** flag with the command to diagnose possible issues if it is not working as intended. You can use **stop** instead of **start** to make the interface go back to managed mode and use wi-fi as usual.
Since the default interface tends to be **_wlp8s0_**, that is what I am going to use for this page.
---
Change your MAC:
**ip link set dev wlp8s0 down** - bring the interface down so you can make changes to it
**macchanger -r wlp8s0** - randomize MAC address completely. Alternatively use -m option and supply an address starting with 68:5D:43 or any other vendor specific address, as some routers and networks will not allow MAC that is not assigned to any vendor. (MAC is in this format XX:XX:XX:YY:YY:YY where XXXXXX is vendor specific and YYYYYY is random)
**ip link set dev wlp8s0 up**
### Wifite
There is a script called **wifite** that can do most of these attacks even if the attacker doesn't understand them. It fails in some more complicated cases.
**git clone https://github.com/derv82/wifite**
**cd wifite/**
**sudo python2.7 ./wifite.py**
### Scan your surroundings
**sudo airodump-ng wlp8s0mon**
### MAC address filtering
Use airodump to look for an active client and change your MAC address to theirs.
### Hidden SSID
aireplay-ng -0 0 -a 00:1F:1F:1F:1F:1F -c 00:1F:1F:1F:1F:1F --ignore-negative-one wlp8s0mon
while running airodump. Successfully deauthing a client will make them broadcast the SSID in the clear because they'll have to reconnect.
### WEP
airmon-ng start wlp8s0
airodump-ng wlp8s0mon
airodump-ng -w wep -c CHANNEL --bssid BSSID wlp8s0mon
aireplay-ng -1 0 -a BSSID wlp8s0mon
aireplay-ng -3 -b BSSID wlp8s0mon
aircrack-ng filename.cap
### WPA/WPA2-PSK
airmon-ng start wlp8s0
airodump-ng wlp8s0mon
airodump-ng -c _CHANNEL_ -w _filename_ --bssid _BSSID_ wlp8s0mon
aireplay-ng -0 0 -a BSSID wlp8s0mon
After obtaining 4-way handshake:
aircrack-ng –w WORDLIST -b BSSID filename.cap
### WPA2-MGT MSCHAPv2
http://pastebin.com/CnJstqpH
### WPS
Scan for WPS enabled APs
**sudo wash -i _wlp8s0mon_**
For Bruteforcing and logging for possible pixie attack. Use **-K 1** parameter to try pixiewps while reaver is running. The plain bruteforce attack might take minutes to days, but usually it's max 10 hours.
**sudo reaver -i _wlp8s0mon_ -b _BSSID_ -c _channel_ -f -S -vvv -H**
After obtaining at least one response you can use **pixiewps** to try the offline pixie attack. Whole pixiewps command will be saved in a text file if you supplied the -H command. Pixie attack takes anywhere from a second to 30 minutes, and only works if the router is vulnerable to it.
### Cracking a handshake/capture file
#### Using GPU
```
Converting .cap to .hccapx
```
Use cap2hccapx (from the hashcat-utils package)
**cap2hccapx capture.cap capture.hccapx**
```
HCCAP to password
```
**hashcat -m 2500 -w 1 filename.hccapx wordlist.txt**
#### Using CPU
IVS file crack
aircrack-ng -a2 -b F8:8E:88:AA:FF:BB -w wordlist-final.txt ivsfile.ivs
## Other stuff
Find out default gateway
route -n
### Obtaining wordlists
[hashes.org](https://hashes.org/public.php) have awesome leaked lists, so I'm going with a bunch these. You can find different lists on torrent trackers.
**7z x xxx_found.7z -owordlists** - extract file into a folder called 'wordlists'
**cat xxx_found_sorted.txt xxx_found_sorted.txt xxx_found_sorted.txt > mywordlist.txt** - join all lists into one
**sed -r '/^.{,7}$/d' mywordlist.txt > WPAwordlist.txt** - remove everything that is 7 characters or less from the file and write that to a new file. WPA/2 does not accept less than 8 characters.
**sort -T ~ -u WPAwordlist.txt > WPAwordlist_sorted.txt** - change temporary directory to the home directory(sort would fail on a big file if /tmp is too small) and sort into a new file
# SSH
Packages: openssh
Client config: /etc/ssh/ssh_config
Server config: /etc/ssh/sshd_config
[What is SSH?](https://en.wikipedia.org/wiki/Secure_Shell)
Notable config options:
Port # default port(22) is sometimes blocked on networks
X11Forwarding # Lets you connect to the X server(forward GUI apps)
Banner # Display a message before logging in(warning messages are required in some countries), file /etc/issue.net is usually used for that. Alternatively you can show a message after login, simply edit /etc/motd for that.
PasswordAuthentication no # Force use of SSH keys
ChallengeResponseAuthentication no # Force use of SSH keys(default set to no?)
**sudo systemctl enable --now sshd** - Enable sshd service and start it, this is required if you want to host a SSH server so it starts at boot.
By default SSH server accepts user logins(root is disabled by default), but you might want to generate and use SSH keys instead.
Default crypto used is 2048 bit RSA. This is a sane default, you could possibly use 4096 bit RSA(or higher), which has diminishing returns. It takes [about 8x more resources to decrypt 4096 RSA than 2048 RSA](http://i.imgur.com/m1PSs5x.png).
Consider using the newer Ed25519 cipher. Ed25519 is supposedly the best current option. There is no need to set the key size, as all Ed25519 keys are 256 bits. The only problem should be compatibility with old openssh versions.
**ssh-keygen _-t ed25519_** - Generate a keypair - you'll be prompted for a filepath and a [password]([Absolute_System_Basics#Passwords|good)] to secure the key. The passphrase uses AES-128 for encryption. You probably don't want to use a passphrase though, so just leave it empty.
**ssh-copy-id -i ~/SSHkey.pub -p 1234 hostname.org** - Copy the public key to the server via SSH. In the example there is specified file path, port and hostname/IP.
By default the public keys allowed to connect to your machine are saved per line in ~/.ssh/authorized_keys
Cool thing that SSH can do is port forwarding:
Let's say I'm running a webserver on 192.168.122.254 - this command would forward the port 80 to port 20123, only for 127.0.0.1, so you could look at the website via http://localhost:20123 from the host machine you executed the ssh command on! You can of course replace the host(127.0.0.1) with whatever and forward your traffic through just for that website.
ssh -L :20123:127.0.0.1:80 username@192.168.122.254
This is remote mapping instead - executing this would forward the host's port 22 to the remote server's port 20123 - useful if ISP is blocking ports and you want to forward something through another server!
ssh -R :20123:127.0.0.1:22 username@rys.pw
# System Administration
# Software
## Some tips
* Update your firmware where you can - UEFI (confusingly called BIOS by most manufacturers, able to download from your motherboard's manufacturer's website), possibly your drive, soundcard from your headphones,...
* Learn to recognize what an executable is and do not run any that you do not trust, then you have no need for an AV as long as you keep the software up to date (Chocolatey is a huge help with managing updates)
## Wireguard
Example Client config
```ini
[Interface]
PrivateKey =
Address = 10.200.200.2/32
DNS = 8.8.8.8
[Peer]
PublicKey = aHcw4mjbI0md5VwQSJovvASLs0bkd0Dkwa1Ma4y6yW0=
AllowedIPs = 0.0.0.0/0
Endpoint = sc1.rys.pw:51820
```
Example Server config
```ini
[Interface]
Address = 10.200.200.1/24
SaveConfig = true
PostUp = iptables -A FORWARD -i %i -j ACCEPT; iptables -t nat -A POSTROUTING -o ens2 -j MASQUERADE
PostDown = iptables -D FORWARD -i %i -j ACCEPT; iptables -t nat -D POSTROUTING -o ens2 -j MASQUERADE
ListenPort = 51820
PrivateKey = {{ wireguard_private_key }}
[Peer]
PublicKey = 766tBrNv7iinsbd9wMP3yM2ksnIprdT9mgfM9VtFcRM=
AllowedIPs = 10.200.200.0/24
[Peer]
PublicKey = SoFi/vC8IOhBYEMqnFzzuz9umlgDKoo3yytbuIMvizg=
AllowedIPs = 10.200.200.0/24
```
## GRUB
[GRUB on Arch wiki](https://wiki.archlinux.org/title/GRUB)
Get grub to ignore bad devices and install properly:
blockdev --flushbufs /dev/sde && blockdev --flushbufs /dev/sda && grub-mkdevicemap -n
## SSH
[[SSH]]
## Wine
Dependencies: wine wine_gecko wine-mono winetricks
Wine is used to run Windows only executables on other operating systems. [More information about Wine](https://wiki.winehq.org/Wine_User%27s_Guide#What_is_Wine.3F)
You can have multiple Windows "installations" which are called prefixes. In fact it is suggested that you use a new prefix for each application you use.
~/.wine is the default wineprefix (a.k.a. "configuration directory" or "bottle"). You can change which prefix Wine uses by changing the WINEPREFIX environment variable (outside Wine). To do this, run the following in a terminal:
export WINEPREFIX=~/.wine-new
wine winecfg
Alternatively, you can specify the wine prefix in each command, e.g.
WINEPREFIX=path_to_wineprefix wine winecfg
you can create a new 32 bit wineprefix using the WINEARCH environment variable(note: you can also export WINEARCH). In a terminal, type:
WINEARCH=win32 WINEPREFIX=~/.wine32bit winecfg
Do not use an existing directory for the new wineprefix: Wine must create it.
Once a 32 bit wineprefix is created, you no longer have to specify WINEARCH in the command line to use it, as the architecture of an existing wineprefix cannot be changed.
You can use `wine64` instead of `wine` to force 64bit.
There are three Direct3D backends for Wine. Which one you use depends on what features your card supports.
wined3d - The D3D backend included with Wine upstream. It is a translation layer that converts Direct3D calls to OpenGL and then sends them to your OpenGL GPU driver. Usable on all GPUs, but has the worst performance.
wined3d with CSMT - A multi threaded, more optimized version of wined3d. It has the same support as wined3d but is much faster. It still incurs a high CPU overhead but if your CPU is good it can help give you better FPS.
Gallium Nine - A native D3D9 implementation that skips the OpenGL translation entirely, requires less CPU overhead, but requires you use a GPU driver which has the GPU side support built in, which are all the Gallium mesa drivers (radeonsi, r600g, nouveau). Nouveau is the open source nVidia driver, but it lacks performance due to reclocking issues and it does not support the GTX10 series because they haven't released signed binaries to support it.
winecfg - > Drives > Autodetect - binds your home folder
[**Make AppDB reports, it helps the community**!](https://appdb.winehq.org/objectManager.php?sClass=application&sTitle=Browse%20Applications&sOrderBy=appName&bAscending=true)
## How to install SVP on Arch Linux to play interpolated movies
Dependencies: qt5-3d, mpv-git(AUR), svp(AUR)
Pre-requisites(optional): proprietary GPU drivers already installed.
Download and install [mpv-git from AUR](https://aur.archlinux.org/cgit/aur.git/snapshot/mpv-git.tar.gz)
Set up mpv socket - cat > ~/.config/mpv/mpv.conf << EOF
input-ipc-server=/tmp/mpvsocket # Receives input from SVP
hr-seek-framedrop=no # Fixes audio desync
resume-playback=no # Not compatible with SVP
EOF
Note: There's currently a small bug in SVP causing video stuttering - go to SVP control panel > Utilities > Application settings; and play with the number of "threads" which are set to 0 by default. Setting it to 15 fixed the stuttering issues for me.
That's it, running movies through mpv while having SVP manager turned on will play them smoothly!
---
Additionally you can install SMplayer, because MPV alone has almost no GUI and relies heavily on CLI commands.
Dependencies: smplayer
Launch SMplayer > open Preferences > Advanced > Options for MPlayer/mpv and add this to Options --input-ipc-server=/tmp/mpvsocket
## rsync
Packages: rsync
Needs to be installed on both computers.
Using rsync over SSH and custom port:
rsync -avz -e "ssh -p PORT" path/to/folder/or/file domain.com:/copy/to/folder
-z flag for compression, -r flag for recursive, but that is already implied with -a, which preserves file permissions and such. (-a equals -rlptgoD (no -H,-A,-X))
Use destructive syncing – “rsync --del” – This will delete any items on the destination that are not present on the source.
# Virtualization
## Hypervisors
Xen
QEMU
KVM
Hyper-V
## Virtualization under QEMU/KVM
**virt-manager** - start the interface. Make sure to do so after you're already connected to the internet, else it might use the wrong interface and you'll have no internet connectivity on the VMs.
**virt-manager --no-fork** - virtmanager will let you type passwords in the terminal instead of openssh-askpass or something like that
Create a new Virtual Machine using an .ISO image and default settings.
Now you should have a working BIOS VM. To create a UEFI one make sure to check customize install and select UEFI for firmware when creating a new VM.
Bi-directional copy pasting and drag-n-dropping files to a Windows KVM is possible by simply installing [spice-guest-tools](https://www.spice-space.org/download/binaries/spice-guest-tools/spice-guest-tools-latest.exe) on the KVM(default virt-manager setup uses Spice for display, so it works out of the box)
To enlarge .qcow2 image, use command **qemu-img resize _ubuntu-server.qcow2_ +_5G_** Remember it'll end up as unallocated space
-----
## Using LXC/LXD containers
https://wiki.archlinux.org/index.php/LXD
### Virtualization under VirtualBox
Packages: virtualbox linux-headers virtualbox-host-dkms
### GPU Passthrough
https://www.youtube.com/watch?v=37D2bRsthfI
http://blog.wikichoon.com/2014/07/enabling-hyper-v-enlightenments-with-kvm.html
# More stuff
## Webserver in current folder
You can instantly create a webserver hosting contents of the folder you're currently in via python:
python -m http.server 8080
## Tmux
Tmux is a terminal multiplexer, meaning you can SSH somewhere, run tmux there and disconnect without killing whatever you were running, or just have multiple terminal tabs without actually launching more terminals.
Full cheatsheet: http://hyperpolyglot.org/multiplexers
Tip: tmux running a session but list-sessions doesn't show it? This might help **killall -s SIGUSR1 tmux**
If you're running nested tmux sessions, [explanation and tips how to do it efficiently](http://stackoverflow.com/a/8530024). (CTRL+B twice to get into the second level session, thrice to get into third level etc)
Command to detach all other sessions(in case the window is small and other session is blocking resizing): attach -d
**Basic usage:**
tmux - start new tmux session
tmux ls - list active sessions
tmux a -t _sessionName_ - attach to specific session
tmux kill-session -t _sessionName_ - kill specific session
**Inside of tmux:**
CTRL+B d - detach session
CTRL+B % - split current pane vertically
CTRL+B " - split current pane horizontally
CTRL+B ARROW_KEY - move between panes
CTRL+B+ARROW_KEY - resize current pane
CTRL+B z - toggle current pane fullscreen state
CTRL+B x - kill current pane
CTRL+B c - create a new window
CTRL+B n - next window
CTRL+B p - previous window
## Apache
Packages: apache php php-apache(why?) nghttp2
Sources:[Arch wiki ](https://wiki.archlinux.org/index.php/Apache_HTTP_Server)
Configuration files are located in the folder _/etc/httpd/conf_ , the main configuration file is _httpd.conf_
**sudo systemctl enable --now httpd** - Enable and start the httpd service, you should now be able to access the Apache server via localhost:80
PHP7 >
```
in **httpd.conf**
comment **#LoadModule mpm_event_module modules/mod_mpm_event.so**
uncomment **LoadModule mpm_prefork_module modules/mod_mpm_prefork.so**
place **LoadModule php7_module modules/libphp7.so** at the end of the LoadModule list
and **Include conf/extra/php7_module.conf** at the end of the Include list
sudo systemctl restart httpd
```
Notes:
DocumentRoot in the config sets the folder for the website, default is /srv/http/
## nginx + PHP
Packages: php nginx-mainline php-fpm openssl
**systemctl enable --now php-fpm**
**sudo nano /etc/nginx/nginx.conf** - Example config of the server blocks
```
server {
listen 0.0.0.0:80; # listen on IPv4
listen [::]:80 # listen on IPv6
server_name *.rys.pw rys.pw; #Redirect all port 80 requests to HTTPS(443)
return 301 https://$host$request_uri;
}
server {
listen 0.0.0.0:443 ssl http2; #listen for TLS IPv4 connections and enable HTTP2
listen [::]:443 ssl http2; #listen for TLS IPv6 connections and enable HTTP2
server_name rys.pw;
root /usr/share/webapps/mediawiki;
index index.php;
location ~ \.php$ { # serve .php files via php-fpm
fastcgi_pass unix:/run/php-fpm/php-fpm.sock;
fastcgi_index index.php;
include fastcgi.conf;
}
location / {
index index.html index.htm index.php;
}
}
server { #forward traffic going to proxy.rys.pw to another server - useful if you need more servers running.
listen 0.0.0.0:443 ssl http2; #listen for TLS IPv4 connections and enable HTTP2
listen [::]:443 ssl http2; #listen for TLS IPv6 connections and enable HTTP2
server_name proxy.rys.pw;
location / {
proxy_pass http://10.0.0.10:443/;
proxy_redirect default;
proxy_set_header X-Real-IP $remote_addr;
proxy_set_header Host $host;
proxy_set_header X-Forwarded-Proto https;
proxy_set_header X-Forwarded-Ssl on;
}
}
```
You can check if your config is valid via **nginx -t**, and then reload the server config via **nginx -s reload**, instead of restarting the daemon.
**systemctl enable --now nginx** - enable and start nginx
### TLS(used to be SSL)
https://cipherli.st/
https://raymii.org/s/tutorials/Strong_SSL_Security_On_nginx.html
https://www.ssllabs.com/ssltest/analyze.html?d=rys.pw
https://securityheaders.io/?q=https%3A%2F%2Frys.pw%2F
https://observatory.mozilla.org/analyze.html?host=rys.pw
TLS 1.0 being deprecated 30th June 2018[1](https://www.pcisecuritystandards.org/pdfs/15_12_18_SSL_Webinar_Press_Release_FINAL.pdf)
All versions of nginx as of 1.4.4 rely on OpenSSL for input parameters to Diffie-Hellman (DH). Unfortunately, this means that Ephemeral Diffie-Hellman (DHE) will use OpenSSL's defaults, which include a 1024-bit key for the key-exchange.
**cd /etc/ssl/certs && sudo openssl dhparam -out dhparam.pem 4096** - This takes time depending on your single core performance as it's not multithreated.(few mins on i7-4790K, 42~ mins on Raspberry Pi 3B) You can use 2048 but it's weaker, create the stronger file at a later date if you just want to get it running for now.
**sudo nano /etc/nginx/nginx.conf** - place these outside of the server blocks so it applies to all servers.
Hardening
```
ssl_dhparam /etc/ssl/certs/dhparam.pem;
ssl_protocols TLSv1.2 TLSv1.3; # Keep in mind this will break software that is way past it's end of life.
ssl_prefer_server_ciphers on;
ssl_ciphers "EECDH+AESGCM:EDH+AESGCM:AES256+EECDH:AES256+EDH";
ssl_ecdh_curve secp384r1; # Requires nginx >= 1.1.0
ssl_session_cache shared:SSL:10m;
ssl_session_tickets off; # Requires nginx >= 1.5.9
ssl_stapling on; # Requires nginx >= 1.3.7
ssl_stapling_verify on; # Requires nginx => 1.3.7
#resolver $DNS-IP-1 $DNS-IP-2 valid=300s; # I do not understand those so I disabled them
#resolver_timeout 5s;
#RESOLVERS: if you don't specify any, nginx will resolve HTTP upstream server hostnames when starting up, and will never attempt to re-resolve them. This is a problem if later the IP addresses of these upstream servers change. But if you define resolvers in nginx.conf, it will honor the TTL of DNS records, and re-resolve the hostnames periodically.
#Make sure you correctly respond to this or the issue is fixed before defining the resolver. http://blog.zorinaq.com/nginx-resolver-vulns/
add_header Strict-Transport-Security "max-age=63072000; includeSubdomains; preload"; # You can add your domain to Chromium's source code for automatic preloading https://hstspreload.org/?domain=rys.pw
add_header X-Frame-Options DENY;
add_header X-Content-Type-Options nosniff;
add_header X-XSS-Protection "1; mode=block";
#add_header Content-Security-Policy "default-src 'self';"; # if you require no scripting.. likely not the case.
add_header Content-Security-Policy "default-src 'self'; script-src 'self'; img-src 'self' data:; style-src 'self' 'unsafe-inline'; font-src 'self' data:; child-src 'self'; connect-src 'self' https://apis.google.com; object-src 'none' ";
# READ THIS - http://lollyrock.com/articles/content-security-policy/
```
SSL certs - you'll need to use letsencrypt to get these
```
ssl_certificate /etc/letsencrypt/live/rys.pw/fullchain.pem;
ssl_certificate_key /etc/letsencrypt/live/rys.pw/privkey.pem;
```
Add a block that redirects all HTTP requests to HTTPS
```
server {
listen 80;
listen [::]:80;
server_name rys.pw;
return 301 https://$host$request_uri;
}
```
Additionally use
listen 443 ssl http2;
listen [::]:443 ssl http2;
in every other server block to force TLS and support HTTP2 protocol.
## MariaDB
Packages: mariadb
**sudo mysql\_install\_db \-\-user=mysql \-\-basedir=/usr \-\-datadir=/var/lib/mysql**
**sudo nano /etc/php/php.ini** - uncomment extension=mysqli.so
**sudo systemctl restart php-fpm**
**sudo systemctl enable --now mysqld**
**sudo /usr/bin/mysql\_secure\_installation **
Backup:
```
mysqldump --single-transaction --flush-logs --master-data=2 --all-databases -u root -p | gzip > all_databases.sql.gz
```
Restore:
```
gunzip all_databases.sql.gz | mysql -u root -p
```
mysqldump --defaults-file=/path-to-file/SQLcreds.txt --all-databases > my_db.sql
**nano SQLcreds.txt**
```
[mysqldump]
user=mysqluser
password=secret
```
**sudo chown root:root SQLcreds.txt**
**sudo chmod 700 SQLcreds.txt**
## PhpMyAdmin
Packages: phpmyadmin php-mcrypt
sudo nano /etc/nginx/nginx.conf - add a whole new server block for phpmyadmin
```
server {
listen 443 ssl http2;
listen [::]:443 ssl http2;
server_name phpmyadmin.localhost;
root /usr/share/webapps/phpMyAdmin;
index index.php;
location ~ \.php$ {
try_files $uri =404;
fastcgi_pass unix:/run/php-fpm/php-fpm.sock;
fastcgi_index index.php;
include fastcgi.conf;
}
}
```
## Murmur
Packages: murmur
Port: TCP/UDP 64738
Config: /etc/murmur.ini
Setting valid TLS(SSL) certificate:
uncomment and set these two lines in the config
```
sslCert=/etc/letsencrypt/live/rys.pw/fullchain.pem
sslKey=/etc/letsencrypt/live/rys.pw/privkey.pem
```
## Let's Encrypt
Packages: certbot certbot-apache/certbot-nginx
https://letsencrypt.org/getting-started/
**sudo systemctl stop nginx** - Stop your webserver. In case of apache you want to stop httpd
**sudo certbot certonly --standalone -d rys.pw -d www.rys.pw -d phpmyadmin.rys.pw -d tickets.rys.pw -d pihole.rys.pw -d mumble.rys.pw -d esp8266.rys.pw -d cloud.rys.pw -d paste.rys.pw --email email@example.com --rsa-key-size 4096 --agree-tos**
**sudo systemctl start nginx**
To non-interactively renew *all* of your certificates, run **certbot renew --rsa-key-size 4096 **.
## Postfix
?Final setup - TODO - postfix+dovecot+roundcube+postfixadmin?
Order of importance of records:
SPF > DKIM > DMARC
https://wiki.archlinux.org/index.php/postfix
Packages: postfix #dovecot roundcubemail postfixadmin php-imap
First set up DNS records. I will be using rys.pw, so I set MX record of @ pointed to rys.pw, which is in turn pointed at my VPS.
systemctl enable --now postfix
This will likely land in your spam folder.
echo "Message" | mailx -s "important mail" yourmail@gmail.com
Edit /etc/postfix/main.cf
myhostname = rys.pw
# postfix reload
Now you should be able to resend the test email and see it came from your domain.
Edit /etc/postfix/aliases
root: c0rn3j
# change to your user account, reading email as root is bad
# postalias /etc/postfix/aliases
## For later changes run `newaliases`
Now you should be able to read mail coming from the internet(only for users that exist on the system) and the services on the box.
less /var/mail/c0rn3j
## Access point (WIP)
Packages: hostapd dnsmasq
https://w1.fi/cgit/hostap/plain/hostapd/hostapd.conf
https://wiki.gentoo.org/wiki/Hostapd
https://frillip.com/using-your-raspberry-pi-3-as-a-wifi-access-point-with-hostapd/
sudo nano /etc/hostapd/hostapd.conf
```
ssid=myWifi # SSID of the network
wpa_passphrase=MySuperSecurewifi123 # password for the network
interface=wlan0 # Interface it'll run on
auth_algs=1 # 1=wpa, 2=wep, 3=both
channel=6 # Channel it'll broadcast on
driver=nl80211
hw_mode=g # 2.4GHz, 'a' for 5GHz
rsn_pairwise=CCMP
wpa=2 # WPA2 only
wpa_key_mgmt=WPA-PSK
#In addition to these, RPi3 seems to require those
ieee80211n=1 # nothing would work without this
#wmm_enabled=1 # QoS support
#ht_capab=[HT40][SHORT-GI-20][DSSS_CCK-40] #I did not actually need this
```
sudo nano /etc/sysctl.conf # is this an outdated way to set ipv4 forward on a systemd distro?
```
net.ipv4.ip_forward = 1
```
sudo sysctl -p
sudo iptables -t nat -A POSTROUTING -o eth0 -j MASQUERADE
sudo iptables -A FORWARD -i eth0 -o wlan0 -m state --state RELATED,ESTABLISHED -j ACCEPT
sudo iptables -A FORWARD -i wlan0 -o eth0 -j ACCEPT
sudo sh -c "iptables-save > /etc/iptables.rules"
sudo iptables-restore /etc/iptables.rules # This needs to be executed after boot
sudo nano /ect/dnsmasq
port = 0
sudo ip link set wlan0 up
sudo ip addr add 192.168.2.1/24 broadcast 192.168.2.255 dev wlan0
sudo ip route add default via 192.168.0.1
## Samba(file sharing)
https://wiki.archlinux.org/index.php/samba
Packages: samba
**sudo cp /etc/samba/smb.conf.default /etc/samba/smb.conf** - copy the default config file to the default config path
**sudo systemctl enable --now smb**
**sudo nano /etc/samba/smb.conf**
```
workgroup = WORKGROUP #change to WORKGROUP so it's the same as default windows WG.
valid users = %S # - add this to [homes] to allow users login to their home directories(?)
```
Example block
```
[dolphin]
comment = dolphin ISOs
path = /mnt/3tbRED/DOLPHIN ISOs # SAMBA DOESN'T NEED ESCAPE SEQUENCES FOR SPACES AND SUCH
read only = yes
valid users = c0rn3j
```
```
Samba requires a Linux user account - you may use an existing user account or create a new one.
Although the user name is shared with Linux system, Samba uses a password separate from that of the Linux user accounts.
```
**sudo smbpasswd -a _c0rn3j_** - change samba password of the user
**testparm -s** - will show you the current config
**sudo smbstatus** - list connections to the shares on the server
**sudo systemctl restart smb** - restart samba service to apply new config
Now on the client side...
```
smbclient -L //192.168.1.10 -U% - list public shares on a server
sudo mount //192.168.1.10/homes /mnt/dolphin/ -o user=c0rn3j - example: Mount the home of user c0rn3j to /mnt/dolphin/
```
Mounting every time is tedious though, let's add an entry to fstab to mount it on boot. First we'll need to store the credentials safely though.
**sudo nano /mnt/credentials**
```
username=c0rn3j
password=supersafepassword
```
**sudo chmod 600 /mnt/credentials** - secure it so it's not readable by anyone but root or owner.
**sudo nano /etc/fstab** - and add this line at the bottom
```
//192.168.1.10/dolphin /mnt/dolphin cifs auto,x-systemd.automount,_netdev,credentials=/mnt/credentials 0 0
```
**mount -v** - list all mountpoints
**mount -t _cifs_** - list mountpoints by fs
## GPG Encryption
-c specifies to encrypt symmetrically(symmetrical is harder to crack than asymmetrical), defaults to AES-128 which should be secure enough for now and the near future. AES-256 seems to be noted as 30-40% slower, so if you don't mind taking that performance hit feel free to use that instead(but I do suggest reading why you'd want to do that first as AES-128 is possibly enough for you).
Encryption with a password and AES-256:
**gpg \-\-batch \-\-cipher-algo AES256 \-\-passphrase _password_ -c _file_**
Decryption with a password:
**gpg \-\-batch \-\-passphrase _password_ -o _file_ -d _file.gpg_**
If you are not going to be using an automatic script for encryption/decryption, you can simply omit _--passphrase password_ and you will be asked to enter it manually.
The above example is not secure because any user can execute **ps aux** and see the whole command, including the password.
Now let's do it better!
**nano password.txt** - write your super secret password there
**sudo chown root:root password.txt**
**sudo chmod 700 password.txt**
Encryption with a password in a restricted file:
**sudo gpg --batch --passphrase-file _password.txt_ -c _file_**
Decryption with a password in a restricted file:
**sudo gpg --batch --passphrase-file _password.txt_ -o _file_ -d _file.gpg_**
## LUKS
Check if your password is correct and list slots:
cryptsetup luksOpen --test-passphrase --verbose /dev/sda
Add a key file for automatic unlocking via /etc/crypttab:
cryptsetup luksAddKey /dev/nvme1n1p1 /etc/adatapass
## Ansible
Encrypt a file:
ansible-vault encrypt --vault-id C0rn3j/configs@~/C0rn3j_configs-vaultpass.txt id_ed25519
Encrypt a string for use in playbooks/templates:
ansible-vault encrypt_string --vault-id C0rn3j/configs@~/C0rn3j_configs-vaultpass.txt 'supersecretpassword' --name 'bree_matomo_db_password'
# webOS
Since there's 2 LG TVs in the household, I figured I might as well make a separate page for them.
1. 55UH605V-ZC - 3.10.19-p.45.dharug.k2lp.2 - FW 05.30.60 - webOS 3.3.4
2. 55UK6200PLA - 4.4.84-p.84.gomolsha.lm18a.1 - OTA ID HE_DTV_W18A_AFADABAA - FW 05.50.15 - webOS 4.4.2
There's some ways to jailbreak some LG TVs - [XDA](https://forum.xda-developers.com/web-os/general/getmein-one-time-rooting-jailbreaking-t3887904), [RU forum](http://webos-forums.ru/post23624.html)
You can get SSH access by [following instructions here](https://forum.xda-developers.com/showpost.php?p=78753577&postcount=32).
cat /var/run/nyx/device_info.json - has mac addresses and TV model name among other things
cat /var/run/nyx/os_info.json - webOS version. The version the TV displays is FW version, not webOS version!
Code this as Base64 file called 'query" and execute the curl command to test connection to the update server
```XML
webOSTV 4.0
HE_DTV_W18A_AFADABAA
FIRMWARE
04
10.45
GB
EU
20:17:42:14:b7:43
N
N
01
00
en-GB
```
```bash
curl -X POST -A "User-Agent: Mozilla/4.0 (compatible; MSIE 6.0; Windows NT 5.1; SV1)" -d @query http://snu.lge.com/CheckSWAutoUpdate.laf
```
If query is wrong, server cuts connection - curl: (56) Recv failure: Connection reset by peer
Server also times out very often.
Queries and responses are Base64 encoded.
```bash
# Force ezAdjust menu open as per https://gist.github.com/Informatic/1983f2e501444cf1cbd182e50820d6c1#factory-mode--instart--instop
# Password is 0413
luna-send -n 1 -f luna://com.webos.service.applicationManager/launch '{"id":"com.webos.app.factorywin","params":{"id":"executeFactory","irKey":"ezAdjust"}}'
```
# Windows
# Powershell setup scripts
## Install modern PowerShell
Windows ships with `Windows PowerShell` which is stuck at v5.1, so install latest `PowerShell`
```powershell
winget install --silent --id Microsoft.Powershell --source winget
```
## Post-install script
Dead Windows:
```powershell
# W10 22H2
# Take Cortana off the taskbar
reg add HKCU\Software\Microsoft\Windows\CurrentVersion\Explorer\Advanced /v ShowCortanaButton /t REG_DWORD /d 0 /f
# Hide People button
reg add HKCU\Software\Microsoft\Windows\CurrentVersion\Explorer\Advanced\People /v PeopleBand /t REG_DWORD /d 0 /f
# Delete Windows Defender tray from startup
reg delete HKLM\Software\Microsoft\Windows\CurrentVersion\Run /v SecurityHealth /f
# Disable Skype from startup
reg add "HKCU\SOFTWARE\Classes\Local Settings\Software\Microsoft\Windows\CurrentVersion\AppModel\SystemAppData\Microsoft.SkypeApp_kzf8qxf38zg5c\SkypeStartup" /v State /t REG_DWORD /d 0 /f
# Do not hide tray items when they get cluttered
reg add HKCU\Software\Microsoft\Windows\CurrentVersion\Explorer /v EnableAutoTray /t REG_DWORD /d 0 /f
```
Windows 11 21H2 and later:
```powershell
# W11 21H2
# Disable Teams+Edge from autostartup
# TODO
# Disable Widgets icon from Taskbar
reg add HKCU\Software\Microsoft\Windows\CurrentVersion\Explorer\Advanced /v TaskbarDa /t REG_DWORD /d 0 /f
# Disable Chat icon from Taskbar
reg add HKCU\Software\Microsoft\Windows\CurrentVersion\Explorer\Advanced /v TaskbarMn /t REG_DWORD /d 0 /f
# Align Taskbar to the left
reg add HKCU\Software\Microsoft\Windows\CurrentVersion\Explorer\Advanced /v TaskbarAl /t REG_DWORD /d 0 /f
# W11 21H2 + W10 22H2
# Enable Hyper-V on Pro or Edu
Enable-WindowsOptionalFeature -Online -FeatureName Microsoft-Hyper-V -All -NoRestart
# Ignore CPU freshness check and downgrade minimum TPM version from 2.0 to 1.2 for upgrades
reg add HKLM\SYSTEM\Setup\MoSetup /v AllowUpgradesWithUnsupportedTPMOrCPU /t REG_DWORD /d 1 /f
# Disable Automatic Install of Suggested Apps
reg add HKCU\Software\Microsoft\Windows\CurrentVersion\ContentDeliveryManager /v SilentInstalledAppsEnabled /t REG_DWORD /d 0 /f
# Disable App Suggestions in Start menu
reg add HKCU\Software\Microsoft\Windows\CurrentVersion\ContentDeliveryManager /v SystemPaneSuggestionsEnabled /t REG_DWORD /d 0 /f
# Disable popup "tips" about Windows
reg add HKCU\Software\Microsoft\Windows\CurrentVersion\ContentDeliveryManager /v SoftLandingEnabled /t REG_DWORD /d 0 /f
# Disable Windows Welcome Experience
reg add HKCU\Software\Microsoft\Windows\CurrentVersion\ContentDeliveryManager /v SubscribedContent-310093Enabled /t REG_DWORD /d 0 /f
# Disable xbox game DVR capture
reg add HKCU\Software\Microsoft\Windows\CurrentVersion\GameDVR /v AppCaptureEnabled /t REG_DWORD /d 0 /f
reg add HKCU\Software\Microsoft\Windows\CurrentVersion\GameDVR /v HistoricalCaptureEnabled /t REG_DWORD /d 0 /f
# Show file extensions
reg add HKCU\Software\Microsoft\Windows\CurrentVersion\Explorer\Advanced /v HideFileExt /t REG_DWORD /d 0 /f
# Opening explorer opens in THIS PC rather than RECENT FILES
reg add HKCU\Software\Microsoft\Windows\CurrentVersion\Explorer\Advanced /v LaunchTo /t REG_DWORD /d 1 /f
# Take Search off the taskbar
reg add HKCU\Software\Microsoft\Windows\CurrentVersion\Search /v SearchboxTaskbarMode /t REG_DWORD /d 0 /f
# Hide Task View button
reg add HKCU\Software\Microsoft\Windows\CurrentVersion\Explorer\Advanced /v ShowTaskViewButton /t REG_DWORD /d 0 /f
# Show hidden files
reg add HKCU\Software\Microsoft\Windows\CurrentVersion\Explorer\Advanced /v Hidden /t REG_DWORD /d 1 /f
# Show hidden system files
#reg add HKCU\Software\Microsoft\Windows\CurrentVersion\Explorer\Advanced /v ShowSuperHidden /t REG_DWORD /d 1 /f
# Disable lock screen window when using password, saving one extra click
reg add HKLM\SOFTWARE\Policies\Microsoft\Windows\Personalization /v NoLockScreen /t REG_DWORD /d 1 /f
# Enable Dark Mode for apps
reg add HKCU\SOFTWARE\Microsoft\Windows\CurrentVersion\Themes\Personalize /v AppsUseLightTheme /t REG_DWORD /d 0 /f
# Enable Dark Mode for system
reg add HKCU\SOFTWARE\Microsoft\Windows\CurrentVersion\Themes\Personalize /v SystemUsesLightTheme /t REG_DWORD /d 0 /f
# Disable new context menu, always show the old one
reg.exe add 'HKCU\Software\Classes\CLSID\{86ca1aa0-34aa-4e8b-a509-50c905bae2a2}\InprocServer32' /f /ve
# To revert the above:
#reg.exe delete "HKCU\Software\Classes\CLSID\{86ca1aa0-34aa-4e8b-a509-50c905bae2a2}" /f
# Disable UAC prompts
reg add HKLM\Software\Microsoft\Windows\CurrentVersion\Policies\System /v EnableLUA /t REG_DWORD /d 0 /f
# TODO also disable the UAC service that fails to start and spams eventviewer
# Disable pagefile (? does not look like it disables at a glance)
#reg add 'HKLM\SYSTEM\CurrentControlSet\Control\Session Manager\Memory Management' /v ClearPageFileAtShutdown /t REG_DWORD /d 1 /f
# Delete OneDrive from startup
reg delete HKCU\Software\Microsoft\Windows\CurrentVersion\Run /v OneDrive /f
# Delete all taskbar shorcuts to get rid of Edge, Store and more
reg delete HKCU\Software\Microsoft\Windows\CurrentVersion\Explorer\Taskband /v Favorites /f
# Disable hibernation to get rid of hiberfile.sys
#powercfg.exe -h off
# Kill and restart explorer.exe to apply most changes right now
taskkill /f /im explorer.exe
explorer.exe
# https://chocolatey.org/install
Set-ExecutionPolicy Bypass -Scope Process -Force; [System.Net.ServicePointManager]::SecurityProtocol = [System.Net.ServicePointManager]::SecurityProtocol -bor 3072; iex ((New-Object System.Net.WebClient).DownloadString('https://community.chocolatey.org/install.ps1'))
# Reopen powershell
# Minimal install
choco install -y 7zip-zstd everything googlechrome hashcheck notepadplusplus nomacs smplayer ventoy windirstat vcredist-all
# Remove Chrome from DB, it has its own autoupdater
choco uninstall -n --skipautouninstaller googlechrome
# Further Bloat
choco install -y crystaldiskmark crystaldiskinfo hwinfo mumble keepassxc libreoffice-fresh sharex telegram vscode qbittorrent
```
## Activate Windows
First install vlmcsd and OpenVPN's tap driver for a 10.10.10.10 tunnel, as Windows will refuse to authenticate against a KMS server running on localhost
```powershell
# Open Powershell as admin
choco install -y tapwindows
# https://github.com/Wind4/vlmcsd/releases/latest
# Download the vlmcsd binaries archive and extract binaries/binaries/Windows/intel/vlmcsd-Windows-x64.exe to C:\install\vlmcsd.exe
New-Item -ItemType Directory -Force -Path C:\install
Invoke-WebRequest -Uri https://cloud.rys.rs/s/H3WeZ37ntKxGZ2s/download -OutFile C:\install\vlmcsd.exe
# Install the service
C:\install\vlmcsd.exe -s -U /n -O .
netsh advfirewall firewall add rule name="vlmcsd" dir=in action=allow program=C:\install\vlmcsd.exe enable=yes
# Start the service (it's enabled, reboot would also start it)
net start vlmcsd
# https://docs.microsoft.com/en-us/windows-server/get-started/kmsclientkeys
# https://docs.microsoft.com/en-us/windows/deployment/upgrade/windows-10-edition-upgrades#upgrade-using-a-command-line-tool
# If you do not have Home(Core) installed, you can switch between different editions (not Home)
# You can get a popup with available editions via 'slmgr /dlv all'.
# Get just the editions by copypasting the box and running 'grep Name boxtext.txt | sort | uniq'
# Note: Windows 11 KMS keys seem to match W10 ones
# Switch edition to Edu
Cscript.exe c:\windows\system32\slmgr.vbs /ipk NW6C2-QMPVW-D7KKK-3GKT6-VCFB2
# W11 Edu
slmgr /ipk NW6C2-QMPVW-D7KKK-3GKT6-VCFB2
# Set KMS server to a LAN one
#slmgr /skms 192.168.1.40:1688
slmgr /skms 10.10.10.10:1688
# Force activation now
slmgr /ato
# You should get a box in a few seconds that the activation passed. You can see the license info with
slmgr /dli
```
## Activate Office
```powershell
# Convert Retail to VL first if Office is Retail https://github.com/abbodi1406/C2R-R2V-AIO/blob/master/C2R-R2V-AIO.cmd
# https://docs.microsoft.com/en-us/deployoffice/vlactivation/gvlks
cd 'C:\Program Files\Microsoft Office\Office16'
# Office 2019 Pro Plus
#cscript ospp.vbs /inpkey:NMMKJ-6RK4F-KMJVX-8D9MJ-6MWKP
# Office 2021 Pro Plus
cscript ospp.vbs /inpkey:FXYTK-NJJ8C-GB6DW-3DYQT-6F7TH
cscript ospp.vbs /sethst:10.10.10.10
cscript ospp.vbs /act
```
## Force W10 to W11 upgrade
```powershell
# Source for some of these: https://github.com/pbatard/rufus/wiki/FAQ#do-you-plan-to-remove-other-windows-11-installation-restrictions
# Can also be done by doing SHIFT+F10 from an unmodified booted W11 installer -> regedit and adding the LabConfig values
## Upgrade W10 to W11 with at least TPM 1.2
# Ignore CPU freshness check and downgrade minimum TPM version from 2.0 to 1.2 for upgrades
reg add HKLM\SYSTEM\Setup\MoSetup /v AllowUpgradesWithUnsupportedTPMOrCPU /t REG_DWORD /d 1 /f
## Clean install W11 with possibly no TPM, <4GB RAM and on BIOS/UEFI with no Secure Boot
# Bypass TPM check in booted image
reg add HKLM\SYSTEM\Setup\LabConfig /v BypassTPMCheck /t REG_DWORD /d 1 /f
# Bypass 4GB+ RAM check in booted image
reg add HKLM\SYSTEM\Setup\LabConfig /v BypassRAMCheck /t REG_DWORD /d 1 /f
# Bypass SecureBoot check (UEFI check pretty much) in booted image
reg add HKLM\SYSTEM\Setup\LabConfig /v BypassSecureBootCheck /t REG_DWORD /d 1 /f
# Bypass Storage Check... is this even required?
reg add HKLM\SYSTEM\Setup\LabConfig /v BypassStorageCheck /t REG_DWORD /d 1 /f
```
# Download
You can download .ISO of [Windows 10](https://www.microsoft.com/en-us/software-download/windows10ISO) or [Windows 11](https://www.microsoft.com/en-us/software-download/windows11) versions directly from Microsoft's servers. Note that you'll have to spoof the user agent if you're on Windows, as you'll get redirected to the Media creator tool otherwise.
The ISOs provided by MS contain all the editions (sans enterprise pretty much), but you might have to add.../sources/ei.cfg file to show them all.
~~You can download older versions of windows and different versions of W10 through [this method](http://www.techfleece.com/2015/12/23/download-official-isos-of-windows-7-windows-8-1-or-windows-10-legally-and-for-free/)~~
If you want Enterprise, one way to get it is to install Pro/Edu and then switch the license, as per the powershell example above.
[Links to various Microsoft images](https://tb.rg-adguard.net)
# Reboot into UEFI
Open admin cmd.exe and run:
```powershell
shutdown /r /fw /t 0
```
# Windows 11 Installation
[Boot from the flash drive](https://rys.rs/Creating_a_bootable_flashdrive). Remember to always select "Custom" where applicable. You can skip creating a Microsoft account by trying to login with a nonexistent email.
Windows usually gets all the drivers itself, but if something doesn't work as it should you might need to visit your motherboard or device manufacturer's website and download drivers/update firmware.
Windows usually downloads an outdated GPU driver so head over to [AMD's](http://support.amd.com/en-us/download) or [Nvidia's](http://www.nvidia.com/Download/index.aspx) website depending on what GPU you have.
If you already have or had a Windows license, then your hardware ID combination(should be motherboard+CPU) is stored on Microsoft's servers and your license will be obtained automatically when you connect to the internet, provided you installed the same Windows version.
If you don't have a W11 license you can either:
1) Buy a license key from official source. **Buying from unofficial sources/grey markets is exactly as illegal as cracking it. You'd be literally giving your money away to thieves. The keys are from hacked MSDN accounts, credit card frauds etc.**
2) If you're in college or some sort of academic institute, they might have MSDN licenses, see if you can find a copy from their IT department.
3) Not activate Windows - you will not be able to use Personalization features and it'll nag you
4) Activate Windows with [KMSpico](http://forums.mydigitallife.info/threads/65739-KMSpico-Official-Thread). Defender will complain about it, allow it manually in Defender after installing it. Alternatively you can use [vlmcsd](https://forums.mydigitallife.info/threads/50234-Emulated-KMS-Servers-on-non-Windows-platforms) if you want an open source, more hardcore solution.
# Upgrade from Home edition
Use a generic key - [W10](https://www.tenforums.com/tutorials/95922-generic-product-keys-install-windows-10-editions.html) or [W11](https://www.elevenforum.com/t/generic-product-keys-to-install-or-upgrade-windows-11-editions.3713/) - to upgrade to the needed edition.
```powershell
# W10/W11 Edu
changepk.exe /ProductKey YNMGQ-8RYV3-4PGQ3-C8XTP-7CFBY
```
This is not a valid key for activation, it only allows for the upgrade.
# Setting up OpenSSH
Due to [this](https://superuser.com/a/1510364/809521), to connect to an admin user, one needs to use
```powershell
C:\ProgramData\ssh\administrators_authorized_keys
```
instead of
```bash
~/.ssh/authorized_keys
```
```powershell
$PSDefaultParameterValues['Out-File:Encoding'] = 'utf8'
echo 'ssh-ed25519 AAAAC3NzaC1lZDI1NTE5AAAAIPR3/QA/+Kq1txg/APGQcpa3UradYnaaxSomDQamFDpH' > 'C:\ProgramData\ssh\administrators_authorized_keys'
# Check that the resulting file is(file is not preinstalled):
# Unicode text, UTF-8 (with BOM) text, with CRLF line terminators
# And not this or anything else:
# Unicode text, UTF-16, little-endian text, with CRLF line terminators
file 'C:\ProgramData\ssh\administrators_authorized_keys'
```
To use sshd, first install it via Optional Features as per the [docs](https://learn.microsoft.com/en-us/windows-server/administration/openssh/openssh_install_firstuse?tabs=gui#install-openssh-for-windows);
To start it, run services.msc and configure OpenSSH Server to start Automatic and also Start it.
Disable password authentication in the config and then restart the server to apply it.
Optionally also disable forcing the key path for admins.
```powershell
C:\ProgramData\ssh\sshd_config
```
If you can't connect to an admin account and you kept the forced key path, [permissions are probably wrong](https://stackoverflow.com/questions/16212816/setting-up-openssh-for-windows-using-public-key-authentication/50502015), run the following to set them correctly
```powershell
icacls C:\ProgramData\ssh\administrators_authorized_keys /remove "NT AUTHORITY\Authenticated Users"
icacls C:\ProgramData\ssh\administrators_authorized_keys /inheritance:r
get-acl C:\ProgramData\ssh\ssh_host_dsa_key | set-acl C:\ProgramData\ssh\administrators_authorized_keys
```
# VM setup
Install [spice-guest-tools](https://www.spice-space.org/download/binaries/spice-guest-tools/spice-guest-tools-latest.exe) on KVM with Spice for better experience.
# eGovernment
Since I was forced to make an eIdentity with my government, mostly due to new laws about customs, I noted down everything needed from the view of someone who had absolutely no eGovernment account before.
Login:
* Since 2018-07-01 IDs come with a chip that can be used for logging in - https://info.eidentita.cz/eop/
* Getting a new ID outside of the expiry period costs 200CZK
* You can login via the 'Mobilní klíč eGovernmentu' app, to authorize yourself you'll need to visit your local CzechPOINT - your local municipal office will likely have one - https://info.eidentita.cz/mep/
* Application refuses to run if it detects a rooted phone
* There are also other options, including authorization through supported banks - https://info.eidentita.cz/idp/
* MojeID gives free GoTrust Idem Keys (600 CZK) - https://www.mojeid.cz/cs/overeno/
* https://www.czc.cz/gotrust-idem-key-usb-nfc-bezpecnostni-klic/306894/produkt
Why:
* You can get test and vaccination results from ÚZIS - https://ocko.uzis.cz/Home/Index
* From 2021-07-01 customs laws change - All arriving packages sent from outside the EU now require to go through customs. This means the <22 EUR exception is cancelled. <45 EUR gifts still need to go through customs, but are not encumbered by duty or tax fees.
* If you do not want to give 200CZK~ to Czech Post for the privilege of giving your package info to customs, you will need to process your package yourself via the eCeP app - https://celnicka.cz/
* https://celnicka.cz/clanky/prehledne-co-se-zmeni-od-1-7-2021
* For those without a data box:
* https://obcan.portal.gov.cz/
* Your physical address is publicly searchable by default, if you only want to correspond with the government, disable SDS listing AND accepting messages from companies and other people
* https://www.mojedatovaschranka.cz/portal/ISDS/nastaveni/pdz/prijem
* https://www.mojedatovaschranka.cz/portal/ISDS/nastaveni/informace/sds
* https://www.mojedatovaschranka.cz/sds/search
* Also make sure you enable notifications
* https://www.mojedatovaschranka.cz/portal/ISDS/nastaveni/notifikace/email
* https://www.datoveschranky.info/o-datovych-schrankach/vyhody-datovych-schranek
* https://www.zive.cz/clanky/zpravy-do-datove-schranky-uz-nezmizi-portal-obcana-je-umi-zadarmo-archivovat-tuto-funkci-ale-musite-zapnout/sc-3-a-206630/default.aspx
* _Je ale nutné si dát pozor. Pokud si funkci aktivujete, budou příchozí zprávy automaticky označené za doručené. Kontrola schránky přitom probíhá jednou za 4 hodiny. Na některé příchozí zprávy je přitom nutnost reagovat pouze po omezenou dobu. Je tak tedy na zvážení, zda si novinku zapnout, či si jen aktivovat e-mailové upozornění na nové zprávy a ty si následně ručně archivovat jinde._
# Electronics
_Current is a gateway drug to magic smoke._
[A list of basic stuff to buy when starting out](https://drive.google.com/open?id=1iwH_ZtXr7coaYTrFlThjA6eoVxLyAfK7Hy3DJzJMR9M)
# Soldering
You might've noticed that some things are super easy to solder, some are super hard.
That's because you may be using a ruined tip(it's supposed to be shiny, not black), low-power iron or solder without lead(Pb). The last possible annoying cause is that the contacts you are soldering on are lead-free. For those I've had to use minimum 370°C and half of the connections I made were garbage.
## How to not ruin a tip
Do not leave the iron on when you are not using it.
Clean the tip by applying solder, wiping it clean on a sponge or steel wool and then coat it with a thin layer of solder to prevent oxidation before you turn it off and leave it, or coat it right after turning it off.
If you use a sponge, make sure it's damp but not soaked.
# Components
## Wires
http://www.powerstream.com/Wire_Size.htm
## LED strips
LED strips from "best" to "worst". Price is according to that.
SK9822 =~ APA102 > APA102C > WS2812B
## Capacitors
If you overvolt a capacitor it will fail in moments, if you go above 50-70% of the voltage limit it will fail in months, or years. All electrolytic caps will fail eventually though, even if idle
## Resistors
https://learn.sparkfun.com/tutorials/resistors
## Batteries
Alkaline typically doesn't have a mAh rating because it's so current dependant
* 2 batteries in series will have the same capacity as 1 battery, it's double the voltage.
* In parallel you get the same voltage, but double the capacity.
* A 1Ah battery at 1.5V can deliver 1.5Wh in an ideal world. Two batteries can deliver 3Wh, so if you put them in series they'll be at 3V, thus the capacity must be 1Ah still to get to 3Wh
* Likewise, if you put them in parallel, the voltage is still 1.5V, in which case you'll get 2Ah from them and end up with the 3Wh
### AA, AAA
To measure voltage just put multimeter to voltage mode and connect leads to positive and negative of the batteries. If the battery is non-rechargeable and way below it's supposed voltage (think <1V for 1.5V battery) it's pretty much dead.
# Laws and equations
## Ohm's law
_The law stating that the direct current flowing in a conductor is directly proportional to the potential difference between its ends. It is usually formulated as V = IR, where V is the potential difference, or voltage, I is the current, and R is the resistance of the conductor._
To explain that in a more useful way - You can calculate for a third variable if you know the other two.
* Voltage(V) = Resistance*Current
* Current(A or I) = Voltage/Resistance
* Resistance(R or Ω) = Voltage/Current
That means if you wanted to know what resistor to use if you had an LED that drops 3.3V, works at 20mA and your power source was 5V - Since the current is the same across the circuit, you'd calculate the voltage drop of the resistor divided by the current, which is 1.7V in this circuit as 3.3V is already being dropped by the LED - (5-3.3)/0.02 and would end up knowing you need to use a resistor that is 85Ω or close to that value.
# Projects
Keep in mind these projects assume you have the parts kit linked at the top of the page.
## ESP8266
[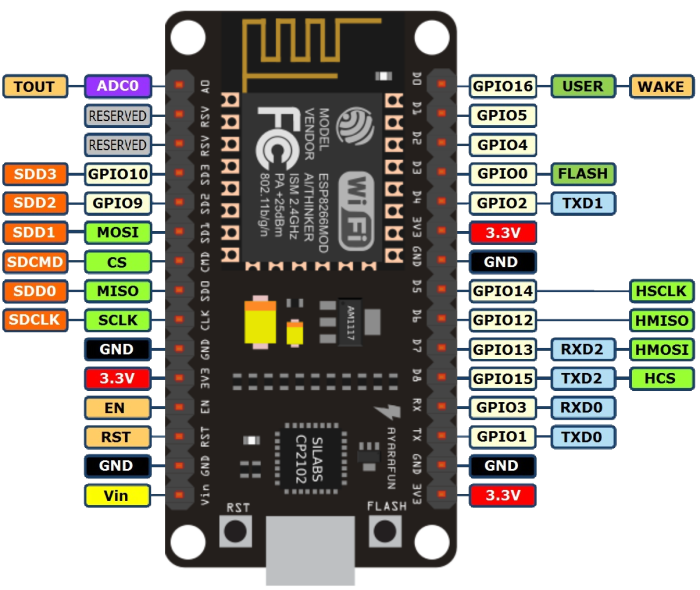](https://rys.pw/uploads/images/gallery/2021-06/esp8266-node-mcu-pinout.png)
Assuming Linux your user needs to be in the lock and uucp groups.
Get the Arduino IDE and setup ESP8266 in it according to [this github readme](https://github.com/esp8266/Arduino).
Connect the board via the microUSB connector and in Arduino>Tools>Port select the ttyUSB0 port. Under Board select the NodeMCU 1.0 one.
Pulling the D0 pin up makes one of the integrated LEDs light up, so it's a quick way to test everything is running, so let's do just that and blink it.
You can use the number notation (GPIO10 is defined as '10') or the pin notation, like D0.
```C++
void setup() {
pinMode(D0, OUTPUT);
}
void loop() {
digitalWrite(D0, HIGH); // turn the LED on.
delay(1000); // wait for 1 second.
digitalWrite(D0, LOW); // turn the LED off.
delay(1000); // wait for 1 second.
}
```
Upload it to the board, it should boot up and the blue LED should start blinking.
Now let's try with an actual LED, grab a red 5mm one. If you'd read the specs sheet you'd know it has a 2V voltage drop and is rated for 20mA of forward current. You need a resistor unless you want to fry the LED with current, so according to Ohm's law a resistor for the remaining 1.3V voltage drop needs to be (3.3-2)/0.02, so around 65 Ohms.
[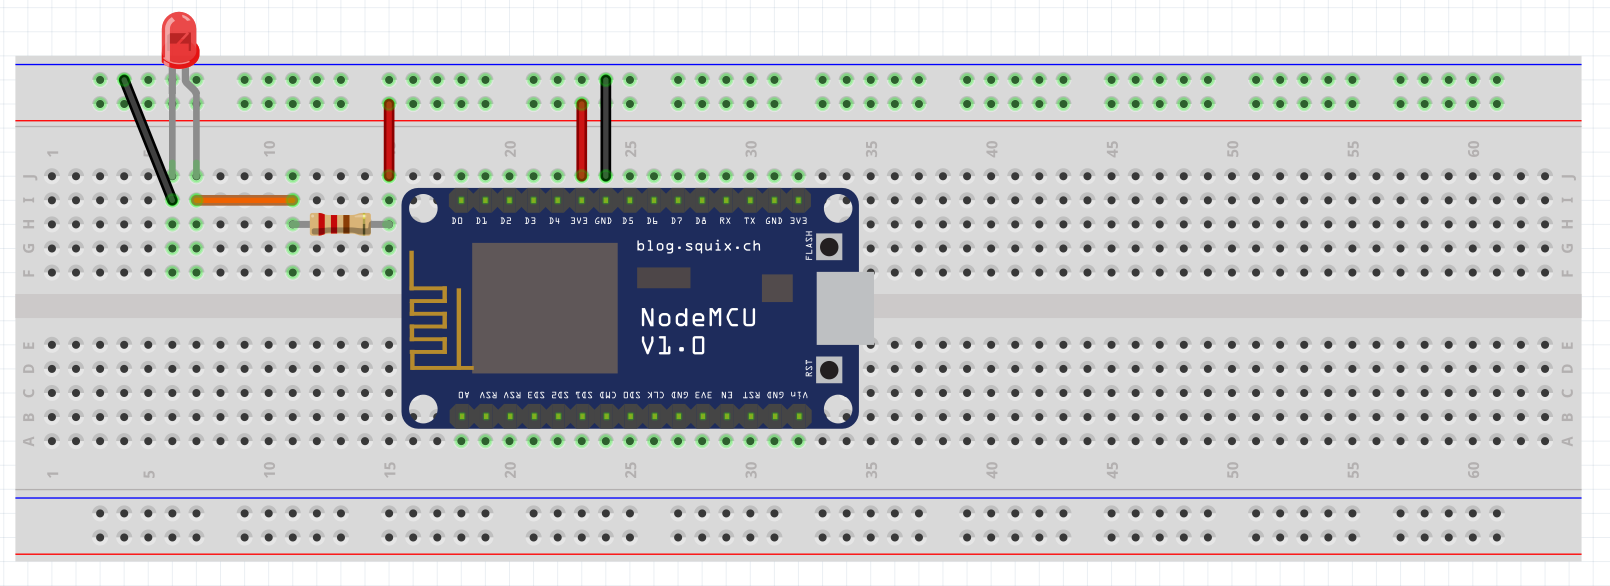](https://rys.pw/uploads/images/gallery/2021-06/esp8266-led.png)
Connect them like so and now you should have the LED permanently glowing. Quite boring, let's make it blink.
Re-connect the resistor from the 3v3 pin to the SD3 one (GPIO10) and replace the code with this:
```C++
const short int LED1 = 10;
void setup() {
Serial.begin(115200);
pinMode(LED1, OUTPUT);
}
void loop() {
digitalWrite(LED1, HIGH); // turn the LED on.
Serial.println("Turned LED1 on");
delay(1000); // wait for 1 second.
digitalWrite(LED1, LOW); // turn the LED off.
Serial.println("Turned LED1 off");
delay(1000); // wait for 1 second.
}
```
Now it should blink! And since we added serial connection and some debugging output, we should be able to connect to it via some software that can read serial, for example 'screen'. Note that 115200 is the baud rate, affecting how fast you can send/receive data.
```
screen /dev/ttyUSB0 115200
```
If you see output every second with on/off sentence, great! You can do ^A and then K to kill the window.
Now let's make the LED Wi-Fi controllable! Same physical setup, different code. Just change the SSID and password in the example:
```C++
#include
const short int LED1 = 10;
const char* ssid = "ssid";
const char* password = "password";
WiFiServer server(80);
void setup() {
Serial.begin(115200);
pinMode(LED1, OUTPUT);
// WiFi.mode(m): set mode to WIFI_AP, WIFI_STA, or WIFI_AP_STA.
WiFi.mode(WIFI_STA);
delay(10);
WiFi.begin(ssid, password);
while (WiFi.status() != WL_CONNECTED) {
Serial.println("Wi-Fi not connected, retrying... ");
delay(500); // Do not use this delay in SoftAP mode
}
// Start the wifi server
server.begin();
Serial.println("IP address: ");
Serial.println(WiFi.localIP());
}
void loop() {
if(WiFi.status() != WL_CONNECTED) {
Serial.println("Wi-Fi not connected, retrying... ");
delay(500); // Do not use this delay in SoftAP mode
}
WiFiClient client = server.available();
if (!client) {
//Serial.println("No client connected, suiciding.");
return;
}
int insanity = 0;
// Wait until the client sends some data
while (!client.available()) {
insanity++;
if (insanity == 1000) {
Serial.println("And nobody came...");
return;
}
delay(1);
Serial.println("Waiting for client to send data.");
//client = server.available(); // Check if the connection didn't break, if yes, kill it.
//if (!client) {
//return;
//}
}
Serial.println("Client available, receiving data...");
// Read the first line of the request
String request = client.readStringUntil('\r');
client.flush();
// Match the request
if (request.indexOf("/OFF") != -1) {
digitalWrite(LED1, LOW);
}
if (request.indexOf("/ON") != -1) {
digitalWrite(LED1, HIGH);
}
// Return the response
String html = String("HTTP/1.1 200 OK\r\n") +
"Content-Type: text/html\r\n" +
"\r\n" +
"" +
"" +
"" +
"" +
"" +
"" +
"ON
" +
"OFF
" +
"" +
"";
client.print(html);
delay(1);
}
```
Get the IP either from serial or your DHCP server list. Open it in your browser and you should see two buttons that turn the LED off and on.
### IR
Now that you know enough to get going, time to dive into something fun, IR. Let's make a thing that can both receive and send.
You'll need a 2-pin IR LED, 3-pin 1838 IR receiver, 2N2222 NPN transistor, 100 Ohm resistor and some wires.
[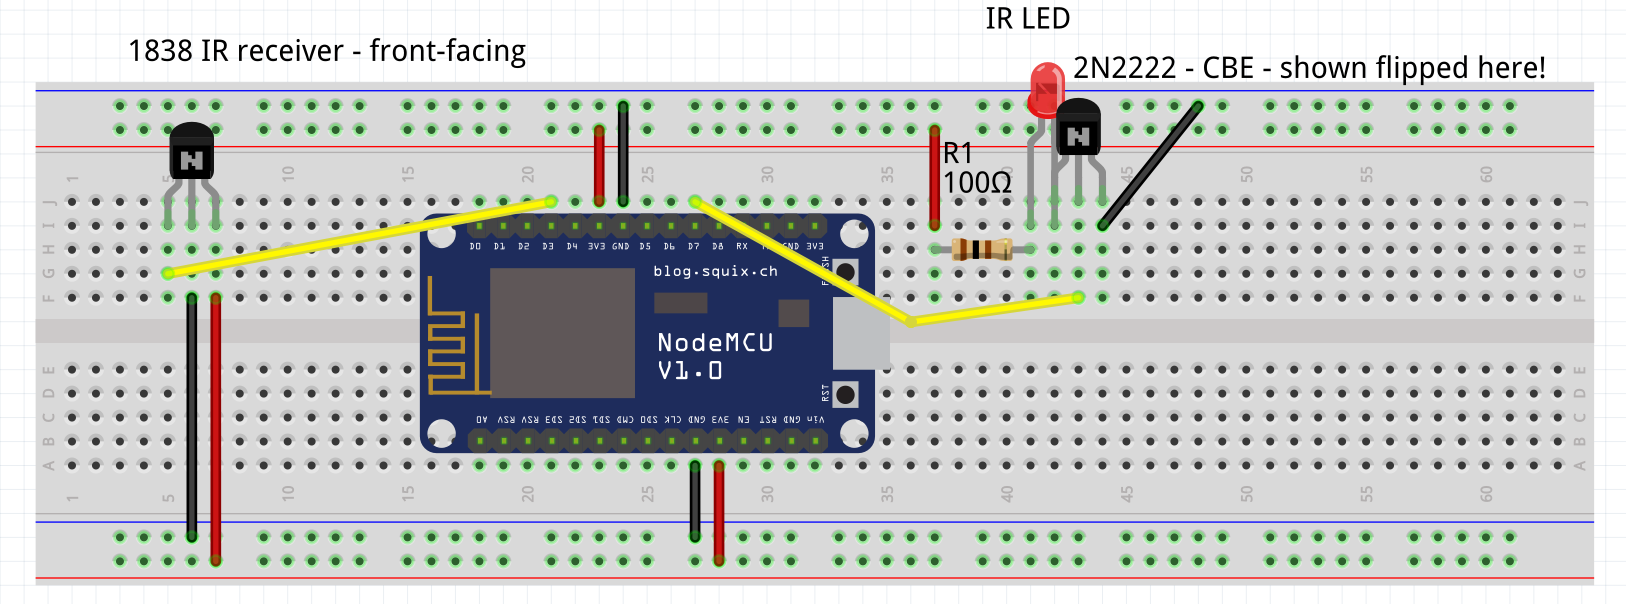](https://rys.pw/uploads/images/gallery/2021-06/ir-rec-send.png)
You will need to setup [the IR library for ESP8266](https://github.com/markszabo/IRremoteESP8266)
Keep in mind that at least on the NodeMCU board linked in the doc with stuff to buy you can't use GPIO 1,3,9,10,15,16 for IR receive(and possibly send), the limitations are mostly explained [here](https://tttapa.github.io/ESP8266/Chap04%20-%20Microcontroller.html).
I used this code to test which GPIOs I can use for receiving:
```C++
#include
#include
#include
#include
#include
#include
#include
#include
#include
#include
#include
#include
#include
#include
#include
#include
const char* ssid = "ssid";
const char* password = "password";
WiFiServer server(80);
int RECV_PIN = 0; //IR IN
IRrecv irrecv(RECV_PIN);
decode_results results;
void setup() {
Serial.begin(115200);
irrecv.enableIRIn();
// WiFi.mode(m): set mode to WIFI_AP, WIFI_STA, or WIFI_AP_STA.
WiFi.mode(WIFI_STA);
delay(10);
WiFi.begin(ssid, password);
while (WiFi.status() != WL_CONNECTED) {
Serial.println("Wi-Fi not connected, retrying... ");
delay(500); // Do not use this delay in SoftAP mode
}
// Start the wifi server
server.begin();
Serial.println("IP address: ");
Serial.println(WiFi.localIP());
Serial.print("RECV_PIN now: ");
Serial.println(RECV_PIN);
}
void loop() {
if (irrecv.decode(&results)) {
Serial.println((long int)results.value, HEX);
irrecv.resume(); // Receive the next value
return; // Kill the cycle
}
if(WiFi.status() != WL_CONNECTED) {
Serial.println("Wi-Fi not connected, retrying... ");
delay(500); // Do not use this delay in SoftAP mode
}
WiFiClient client = server.available();
if (!client) {
// Serial.println("No client connected, suiciding.");
return;
}
int insanity = 0;
// Wait until the client sends some data
while (!client.available()) {
insanity++;
if (insanity == 1000) {
Serial.println("And nobody came...");
return;
}
delay(1);
Serial.println("Waiting for client to send data.");
}
Serial.println("Client available, receiving data...");
// Read the first line of the request
String request = client.readStringUntil('\r');
client.flush();
// Match the request
if (request.indexOf("/NEXT_PIN") != -1) {
nextPin();
}
// Return the response
String html = String("HTTP/1.1 200 OK\r\n") +
"Content-Type: text/html\r\n" +
"\r\n" +
"" +
"" +
"" +
"" +
"" +
"" +
"NEXT_PIN
" +
"" +
"";
client.print(html);
delay(1);
}
void nextPin() {
irrecv.disableIRIn();
delay(100);
RECV_PIN = RECV_PIN+1; //IR IN
Serial.print("RECV_PIN now: ");
Serial.println(RECV_PIN);
IRrecv irrecv(RECV_PIN);
decode_results results;
irrecv.enableIRIn(); // Start the receiver
delay(100);
}
```
# Geopricing
Lots of services give you different prices depending on which region you appear to be from.
[Here](https://en.wikipedia.org/wiki/Geographical_pricing) is a handy wiki page explaining the concept.
This page documents the various services I use and their caveats.
Keep in mind that trying to cheat this system breaks TOS of practically all services.
### Bandcamp
Bandcamp charges you VAT if your IP is from a country where VAT is collected, as opposed to for example Israel.
### Netflix
[Geopricing sheet](https://docs.google.com/spreadsheets/d/1usSHC2Vrb4KRk3WCu_2LLhls5qtBHHRuh_9ESeXI3nw)
Netflix has not only different pricing but the service they offer can differ. For example, in Turkey they offer a plan not available anywhere else, a very low-cost mobile plan.
You should be able to set up payments via any debit card for any region as long as your IP is from that region. For example you could use a Turkish proxy to have the service for half the price, you only ever need to appear from TL IP while you set up the payment method.
Netflix's library content is based on your current IP.
### Steam
Steam store's regional pricing is set by game publishers and can vary a lot, but places with bad economy generally have cheap games, with Turkey being the best as of writing due to Turkish Lira crashing a lot.
Currently, at first payment after your account's creation your account's geolocation is decided. You can change it once per 3 months, and you need an IP and payment method of the country you're changing to, simply change the country checkout when you're buying something.
You can only charge up or pay for a game through a valid payment method in the region you're buying the game in.
You should always shop from the same country's IP, as of 2022-08 Valve has apparently taken notice of this trick and started soft-changing the region of the account.
Around 2023-07, Valve has stopped providing gift cards to Turkey, Argentina and possibly others.
You can, however, activate a [digital](https://store.steampowered.com/digitalgiftcards/selectgiftcard) or [physical](https://store.steampowered.com/account/redeemwalletcode)* steam gift card from any region**, currency will autoconvert.
\* Digital cards can only be sent to people you've been friends for 3+ days with
\** Any region as long as the currency gap is not too large(?), gifting from EUR to Turkey or Argentina will give a `There seems to have been an error initializing or updating your transaction. Please wait a minute and try again or contact support for assistance.` error for example
To activate a georestricted game:
* Your account needs to match the region of the game(maybe?)
* You need to have an IP from the region your account is from
* The last IP that has logged into the desktop client (or ASF) has to be from the same region
* No recent (1hr?) logins from other regions to the desktop client (or ASF)
To make a purchase with a debit/credit card, it must not have been used on 4 other accounts previously, it seems.
Some games change their language availability depending on your region. Such is always noted in a warning on the store page for the game however.
### Runescape
Looks like Mexico is one of the cheapest regions to get membership through.
Regional IP only needed for payment. Takes any debit card if I recall correctly.
### Battle.net
You can have a US, EU or RU account on Battle.Net(possibly more). This is decided at account creation time and changing this seems to require a valid ID and contacting support.
RU has most things for half the price, including World of Warcraft expansions and subscriptions.
While Battle.Net will actually let you use a debit card from any region, it will be declined and your payment refunded after a few hours. If you intend to have a RU account, you need to charge it up via a valid russian payment method or... game cards. Shady sites like plati.market have resellers that sell such cards with next to no profit.
### Patreon
Patreon charges you VAT if your account is set to a country where VAT is collected, as opposed to for example Israel.
### GOG.com
Just use a russian proxy and your own debit card...
### Youtube Premium Family
One of the cheapest regions for Premium is Turkey, as of writing it is priced at 116 TL/mo for a [family plan for 6 people](https://www.youtube.com/premium/family).
You will need a debit card from any region, a proxy/VPN that is actually good and the premium page will show you that the plan is available.
People you [invite](https://myaccount.google.com/family/details) to share the family plan with need to be joining from the same geolocation as your account's address. If you have trouble with Alphabet thinking you're still located in a different country, you'll need to make sure that your [Google Pay account](https://pay.google.com/#settings) is set to the same country as the host's address. If you have multiple Pay profiles, you may have to close the other ones. You can add them back afterwards.
Family groups aren't available for G Suite accounts.
### PayPal
Sending money via PayPal is tricky - sending as a product has less fees than sending as friends&family.
This calculator has worked for me in the past - https://www.salecalc.com/paypal
### Disney+
Turkey seems to be cheapest at 350TL/year
You will need a non-VPN (or at least not flagged) Turkish IP and the easiest way seems to be to get a Turkish Google account and pay via G2A prepaid cards through Play Store.
https://play.google.com/redeem
https://www.youtube.com/watch?v=YqnyJcvIMH0
### Microsoft Family
One can buy retail keys and have 6 family members sharing Microsoft Office + 1TB OneDrive https://account.microsoft.com/family/home
# Raspberry Pi as fake mass storage
**Disclaimer: Since the advent of [Ventoy](https://ventoy.net/), this is much less useful, but a fun project nevertheless.**
# Intro
Ever wanted a Multiboot drive but realized turning a flash drive into one is impossible with some images(Windows in particular), and commercial solutions [start at 50 EUR](https://www.amazon.com/Iodd-Iodd2531-Black-Virtual-Enclosures/dp/B00TDJ4BJU/)?
Let's use the 10 EUR Pi Zero W instead.
The board uses MiniHDMI. You can find Mini+MicroHDMI to HDMI connectors for under 1 EUR on Aliexpress. However video output is technically not needed, especially if you have the W version of the board.
The 5 EUR Pi Zero without Wi-Fi can also be used, but is less comfortable for my use, pushing images over the internet into it via rsync is comfy.
[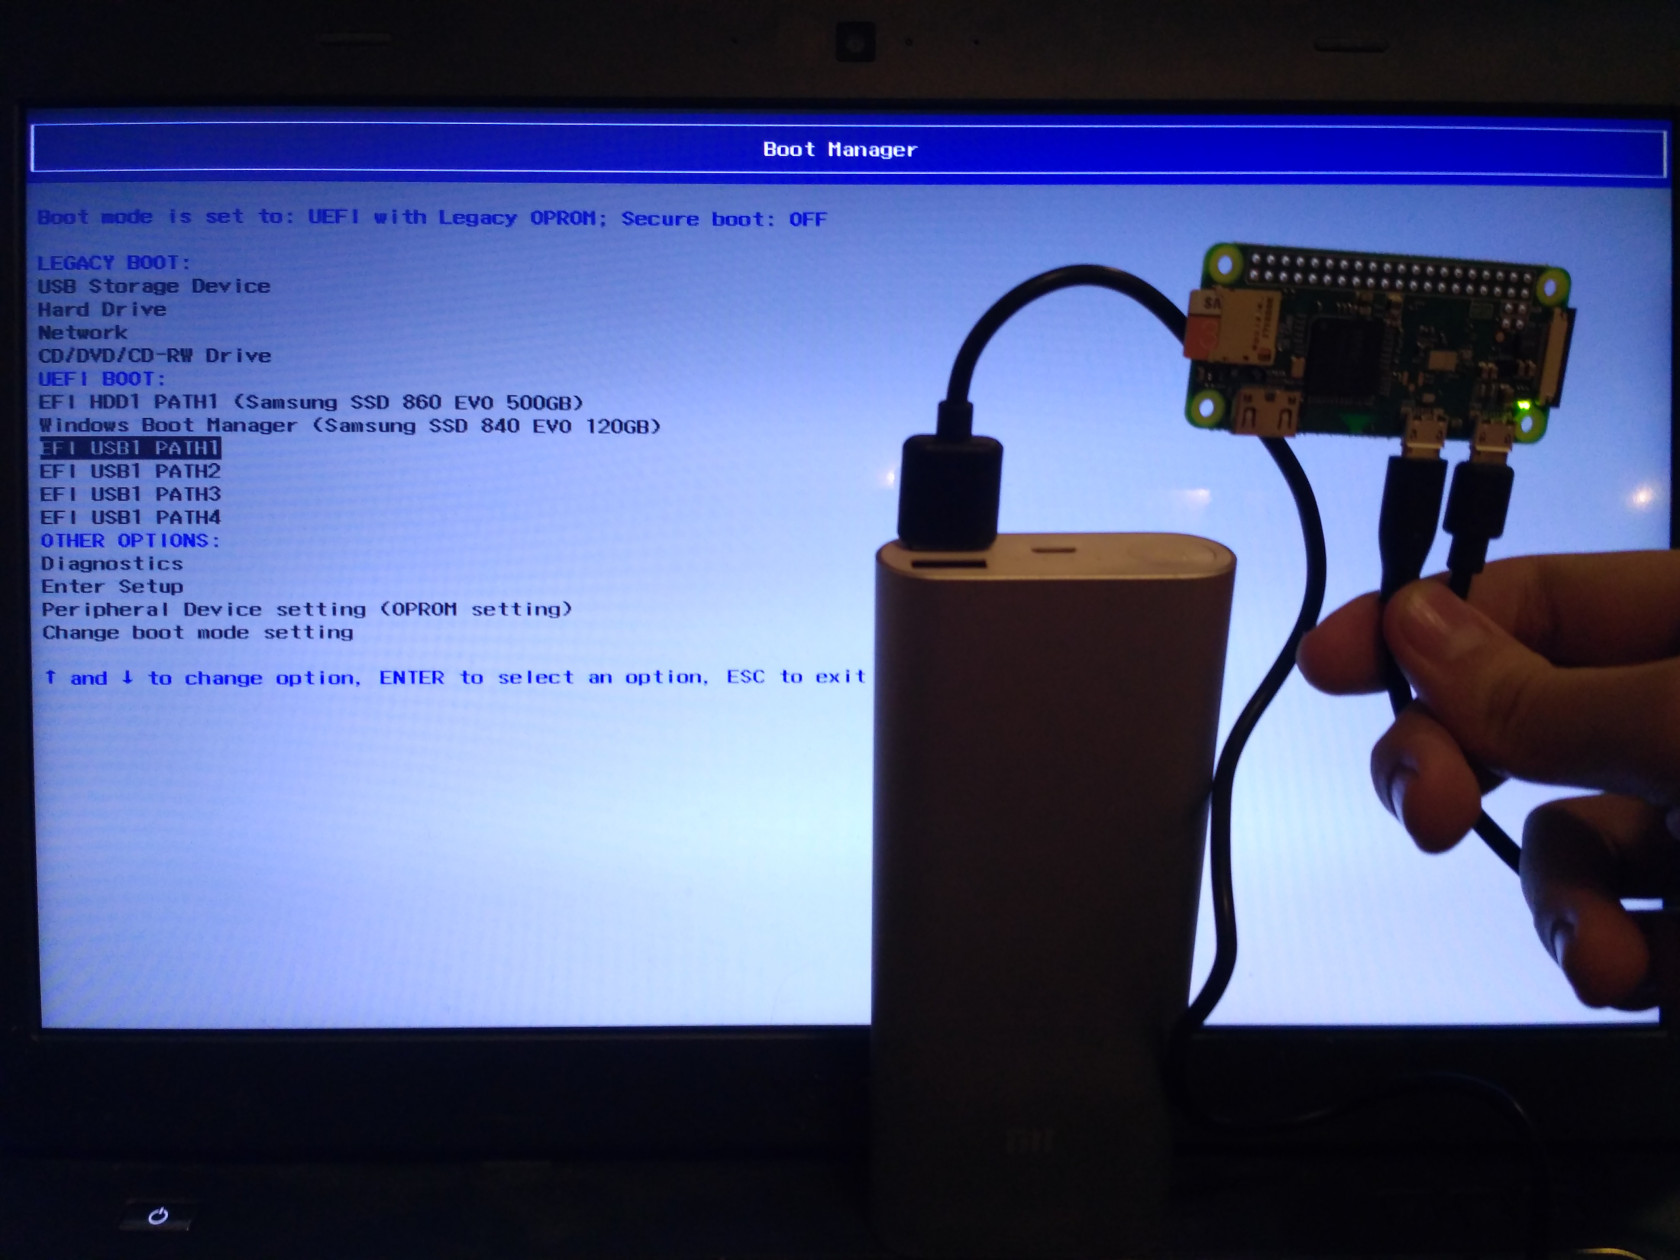](https://rys.pw/uploads/images/gallery/2021-06/pi-mass-storage.jpg)
Benefits over a simple flash drive:
* Can store many images
* No need to flash the whole storage every time
* Can push images to it over the internet (W version)
* Can pretend to be a USB CD-ROM for compatibility with old hardware
* Can host up to 8 images at the same time, including simple storage, so you can use it as a flash drive + bootable ISO concurrently EDIT: This should go up to 256 with max_loops kernel param possibly?
* Cool points
Disadvantages:
* You need a power source
* Physically bigger than a simple flash drive
* Longer initial setup
Requirements:
* Pi Zero (W)
* MicroSD card
* Computer with Linux
Optional:
* $1.5 china case
* OLED screen
* Physical buttons
Problems:
* [Can't get BIOS boot to work through GRUB (Windows) via loop back created image](https://github.com/rhboot/grub2/issues/47)
* Mounting via mass storage does not give the 'device' a name, making it really confusing if you're hosting multiple images at once, as per the picture
* Mounting images as DVD-ROM is not possible and CD-ROM is limited to 2.4GB, if you're a kernel dev or wanna try fixing that - here's a [thread on LKML](https://lkml.org/lkml/2015/3/7/388) and a [hacky patch](http://linuxehacking.blogspot.com/2013/07/how-to-emulatore-dvd-rom-hardware-usb.html)
* Rebooting the computer when booted in the OS reboots the Pi. Here's a bunch of possible solutions for that if you care:
```
I want to power a raspberry pi zero from a power bank, while also use it for data connection with a PC. This is an issue because as the PC reboots, so does the Pi sometimes, pretty sure its trying to take power through the PC instead of the power bank
how do I prevent it trying to power itself off of the second USB port?
you get a USB Y-cable and connect the "middle" plug to PC, the "extension" plug to powerbankand obviously the other end to SBC, then you hope your PC won't barf up when external USB VBUS during reboot
smarter approach is to add two schottky or ideal diodes from powerbank and from PC to SBC VBUS in
a third solution is to use a cheap externally powered USB hub that's powered by your powerbank. The cheap USB hubs simply feed through external power to downstream USB VBUS
hope I explained it sufficiently obscure to question all answers ;-)
the hub simply feeds through the external power barrel jack to the downstream USB ports
it however sometimes (not all do) has a diode preventing 5V power to go back from hub to PC
the expensive high-quality hubs *might* have a transistor switch between external 5V in and each downstream port, and control those transistors via software. Rarely ever to be found but you should keep in mind those exist, when you encounter strange behavior
then, USB also knows of a "software" suspend command that your SBC obviously should ignore if the PC actually does send it during reboot
```
# Setup
My OS of choice is Archlinux ARM for the board, Pi Zero is essentially Pi 1. Follow the [install guide](https://archlinuxarm.org/platforms/armv6/raspberry-pi) for it. Stop before step 7 if you have to W version to setup Wi-Fi first.
## Wi-Fi
If you have the W version of the board, you will want to setup Wi-Fi:
```bash
cat << EOF >> root/etc/systemd/network/wlan0.network
[Match]
Name=wlan0
[Network]
DHCP=yes
EOF
wpa_passphrase yourSSID yourPassword > root/etc/wpa_supplicant/wpa_supplicant-wlan0.conf
ln -s /usr/lib/systemd/system/wpa_supplicant@.service root/etc/systemd/system/multi-user.target.wants/wpa_supplicant@wlan0.service
```
## USB Gadget
Now we setup the USB Gadget which will let us use all the fun features.
Edit /boot/config.txt and add a new line to it to use the needed driver:
```
dtoverlay=dwc2
```
Create /etc/modules-load.d/usbgadget.conf with the following content:
```
dwc2
g_mass_storage
```
Add `max_loop=256` to the end of `/boot/cmdline.txt`. This raises amount of max loop devices from 8 to 256.
We're only interested in g\_mass\_storage for this use case. There is many more uses for this driver, check out [this gist](https://gist.github.com/gbaman/50b6cca61dd1c3f88f41) if you're interested.
## Additional OS setup
If you're using the W version, install rsync, openssh, enable sshd on boot, disable password auth in sshd\_config and throw your pubkey in root's authorized\_key file.
W or non-W, reboot the board.
# Usage
You have two ways to host your images - either via emulated mass storage or emulated USB CD-ROM.
Power the board on by connecting the PWR IN port to a power source. A power bank or another PC will do.
You will have to connect the board through the other USB port to a turned-off PC and cold boot it after you attach the image. Restarting the PC will also restart the board, see Problems in [[#Intro]].
If you want to mount another image after already mounting one, you have to remove the following first:
```bash
rmmod g_mass_storage
```
## Emulated mass storage
The following approach works for most sane bootable ISOs. Default Windows ISOs are a snowflake and need to be remastered into an image with a FAT32 partition with the files copied over. Look up loopback devices if you need Windows, or implement emulated DVD-ROM as per Problems in [[#Intro]] and use the approach below.
```bash
modprobe g_mass_storage file=/archlinux.iso stall=0
```
You can also specify up to 8 images at once, although you don't want to do this since there's no way to distinguish them in UEFI/BIOS since the module does not give the emulated devices a name.
```bash
modprobe g_mass_storage file=/archlinux.iso,/anotherimage.iso,/guttedwindows.iso stall=0
```
## Emulated USB CD-ROM
This approach does not work with ISOs over 2.4GB, see Problems in [[#Intro]].
```bash
modprobe g_mass_storage file=/archlinux.iso stall=0 cdrom=y
```
Emulated CD drive shows up as /dev/sr*
# Additional setup
Tip: While this guide is for loading ISO images, you can load any image, including simple storage, or read only storage etc.
## Case
An acrylic case is some $1.7 [from Aliexpress](https://www.aliexpress.com/item/Raspberry-Pi-Zero-W-wireless-Acrylic-Case-with-Heat-Sink-Clear-Black-Enclosure-Blue-Box-for/32815415002.html).
TODO - picture
## Display and buttons
TODO - Here goes additional software and hardware setup
# Sources
https://elixir.bootlin.com/linux/latest/source/Documentation/usb/mass-storage.txt
https://www.kernel.org/doc/Documentation/usb/mass-storage.txt <- why is the formatting broken? Same link as above
[Linux-sunxi](http://linux-sunxi.org/USB_Gadget/Mass_storage) has a bit of info not present on this page, I recommend you give it a read.
# Video Encoding
My TV does not play some video files, this is an attempt to document why and how to reencode things.
`mediainfo` is a handy tool, running it against a file gives you handy info, such as that the encoding settings of the video stream are `ref=10 ... bframes=10`, which is more than my TV can handle, so let's re-encode this.
I've tried using nvenc (hevc_nvenc for x265) to encode, but then it ignores the crf setting and produces garbage quality output, so am stuck rendering on a CPU.
The -map 0 option needs to be there, or only one audio track will be copied.
The -y option is to overwrite the output file without asking.
The -crf 18 option is there to set quality. You can play around with this if you're not satisfied with the image or think you can save space.
```bash
ffmpeg -y -i original.mkv -c:v libx264 -crf 18 -preset slow -c:a copy -map 0 reencodedx264.mkv
ffmpeg -y -i original.mkv -c:v libx265 -crf 18 -preset slow -c:a copy -map 0 reencodedx265.mkv
```
# System Basics
Hi! This page is supposed to explain phones/laptops/desktops/technology in general. It's obviously completely incomplete.
## Monitors, displays etc
### Frame rate and Sync technologies
Standard for monitors is 60Hz. That means the monitor can display 60 frames per second. In games you might still want your PC to produce more frames than your monitor's refresh rate can physically display, because you will see a newer frame, which means less latency.[1](http://i.imgur.com/DX2H5jt.png)[2](https://www.youtube.com/watch?v=hjWSRTYV8e0)
Source: http://www.blurbusters.com/gsync/preview2/
144Hz monitor - 1000/144 = 6.944ms per frame draw
144Hz G-Sync worst result - 38ms
144Hz No sync worst - 26ms
G-Sync effectively adds about 12ms of input lag over having no sync on 144Hz. That's almost 2 whole frames, which was really noticeable for me when I was testing it on CS:GO.
Having no sync can cause [screen tearing](http://i.imgur.com/PqFEwd5.png) . However, while screen tearing is really noticeable on a 60Hz panel, on a 144Hz one it's much less noticeable and not a problem for me, so I play with no sync.
Keep in mind that Windows doesn't seem to like having two or more monitors connected with different refresh rates. It seems to slow down the other monitors to the frequency of the lower monitor when there's a redraw on it, which makes everything stutter/freeze for a little while.
Linux doesn't seem to have that problem.
## Passwords
Unless you're using a password manager, your passwords are most likely insecure.
Take the LinkedIn database breach - [over 96% passwords were bruteforced already.](https://hashes.org/public.php) That means that less than 4% people are probably using decent passwords. Why probably? Because they could still be using one strong password for all sites, but the moment there's a database leak where passwords are in plain text is the moment when their system becomes useless.
Go read the [XKCD about bit entropy.](https://xkcd.com/936/) Sounds like good advice? It isn't. If we agree that safe password length is 15 characters, and you just used "correct horse battery staple" as a password, you've just effectively made a "4 character" password to someone who has a script that uses whole dictionary words to bruteforce it_(taking in account that the number of commonly used words is much larger than the number of characters in the alphabet(26))_. Even if you start adding numbers here and there, it's still not good as someone could use modified version of that script so it tries replacing letters with numbers, and you also end up having the problem the XKCD itself talks about. Think that any word or any sequence of characters counts as one character.
I've hopefully convinced you that remembering 15 completely different passwords is impossible and using the same or similar password on those 15 sites is stupid. What's the solution then? A password manager.
You should also expect certain things from the password manager.
* It needs to be open source - It will deal with all your passwords, the possibility to check what the program actually does is a need.
* It needs to work cross platform - It needs to be capable of working on all mainstream operating systems and devices.
* It needs to be self-hosted - Dealing with your database somewhere on the web is just another attack vector. Also, you need to rely only on yourself, not on anyone else. What if the site goes down?
* It needs to be secure - This bit is on you too, using autofill adds [another attack vector,](https://labs.detectify.com/2016/07/27/how-i-made-lastpass-give-me-all-your-passwords/) so I personally avoid it.
I've found [KeePassXC](https://www.keepassxc.org) to satisfy those needs([Android implementation](https://play.google.com/store/apps/details?id=com.android.keepass&hl=en)). You only need to make one strong password for the database file and you're set. Remember to have multiple backups of the database file. Setting a timeout on the clipboard and database to 30~ seconds should be a good idea.
**Keep in mind that if you follow all the advice here, you will lose access to your accounts if you lose access to your password database backup. It would be a good idea to [encrypt it with 256-bit AES](https://rys.pw/System_administration#GPG_Encryption) and keep it with someone you trust or somewhere safe offsite. Imagine some very unlikely event like tornado/flood passing through your house, you probably won't have access to anything in it afterwards, so plan ahead.**
### 2 Factor Authentication
2FA is an awesome thing which adds another layer of security. Service you're using has to obviously support 2FA.
There is a lot of [implementations since most 2FA is based on an open standard.](https://en.wikipedia.org/wiki/Google_Authenticator#Implementations)
2FA works like following: Site gives you a secret key(sometimes in a form of QR code with a small button that reveals it in plain text), which you will supply into your 2FA app on your device(s), and the application on the device(s) will give you a generated code which works for a short time, you will need that code to login to the service after supplying your username and password. '''Remember to backup the secret key.'''
Your time on the device needs to be correct otherwise you will receive invalid codes.
2FA does not only mean that you have an app with a secret key and timed codes, but can also be a device, or SMS/call codes...
You cannot trust your cell provider, **SO DO NOT** use SMS/call authentication if you can avoid it.
Using an open source authenticator app is highly recommended, it is a layer of your security, you should be able to look at the source code.
Personally I use [WinAuth](https://github.com/winauth/winauth) for desktop. It is an open source app made for Windows, with support not only for the traditional Google Authenticator algorithm but also services like Battle.net or Steam. It also works well on Linux [with WINE](https://appdb.winehq.org/objectManager.php?sClass=application&iId=17681).
For phone I use [FreeOTP](https://freeotp.github.io/). Google Authenticator is not open source anymore, so I'd advise against using it.
Remember that 2FA is a **Two** Factor Authentication, having your password and 2FA system saved on the same computer effectively makes 2FA useless.
## Backups
Hard drives fail, flash drives fail, DVDs/BDs deteriorate, solid state drives fail, accounts get hacked and the data wiped, data corruption happens... You need a good backup system.
## Security through encryption
### Wi-fi security
Use WPA2-PSK with AES encryption, disable WPS and use a password that you would not find in a dictionary nor one that can be bruteforced.
That means you shouldn't use WPA/WPA2, just pure WPA2, you should not use TKIP, only AES.
For WPA2 Enterprise networks, do not use MSCHAPv2 protocol.
[Here's why](https://rys.pw/Offensive#bkmrk-attacking-802.11)
### TLS
### File encryption
### VPN
## Privacy
### Why? I have nothing to hide
Privacy is a human right. People should have control over and access to the data they produce. If this right is not granted, people give significant power to those who have the access to and control over information. Even though they might be trusted now, no one can predict who will have the access and control in the future. Data about you is a leverage point for predicting and influencing your future actions. It is power over you.[[1]](http://nakedapproach.fi/2015/07/16/10-nordic-principles-for-a-hyperconnected-planet/)
## Instant messaging
### Telegram
Also known as "Give me 5 digits to reset an account and gain control over it"
## TOR
## Operating systems and everything around them
There's tons of operating systems and tons of their variations. I'll list some of the most used ones.
### Android
You can backup and restore android appdata without root.
```bash
adb backup -apk -shared -all -f backup-file.adb
adb restore backup-file.adb
```
With root apps should be in /data/app/APPNAME/base.apk and appdata should be in /data/data
### Windows
Runs on x86(Windows 11 dropped support) and x64 and ARM CPU architectures.
You can either buy a retail or OEM license, retail is transferable between devices and OEM is tied to one device(unique motheboard and CPU) only. Retail home edition costs 119$.
The main editions that are still supported are 8.1(2023) and new builds of 10. The number in brackets is the year when the system becomes End Of Life, which means it will stop receiving support and should not connected to the internet at that point.
W10 has following editions:
* **Home** - Lacks features like Group Policy(though you can hack them in), meaning you don't have much control over updates
* **Pro** - More expensive than Home, better control over the OS, RAM support up to 512GB from 128GB, and some more features
* **Enterprise** - For businesses with over 250 computers
* **Enterprise LTSB** - Stable version, does not have any of the metro apps including Edge, Store,... with no way to install them.
* **Education** - Student version with basically all features of Enterprise
* ...and some more less significant ones
In addition to that, each version can be either N or KN(Korean version of N), which removes software like Windows media player and a bunch of other mostly useless software.
There are also Server versions
### Linux
### macOS
It is legal to only run the OS on Apple hardware. macOS running on something else than Apple HW is called a hackintosh, and since actually doing that is very annoying it turns me off the OS, so no more info besides this.
### BSD
## Partition Tables, BIOS and UEFI
Motherboard has firmware, which used to be IBM BIOS, but is nowadays UEFI. Almost everyone incorrectly refers to UEFI as BIOS, including motherboard manufacturers.
Most UEFI implementations have backwards compatibility with how the old BIOS firmwares used to boot, known as CSM (and sometimes as Legacy or simply BIOS). This mode should not be used and is going to be discontinued on Intel hardware post 2020.
BIOS booting works by loading the first 1024~ bytes (it varied) from a drive. This was never standardized. UEFI booting works by either directly booting an entry off a partition(almost never implemented), or by booting off entries in /boot partition(called ESP or EFI) which is standardized, should be FAT32 (FAT16 also works if your OS supports it, and Apple has added in their FS support into their UEFI implementation).
Using the EFI partition allows for multiple installed operating systems without deleting each other's bootloaders, as it used to be during the BIOS times.
**MBR** - Obsolete drive partitioning standard. It does not support more than 4 partitions per drive or drives larger than 2TB. Whole MBR is located on 512 bytes on the first sector of a drive, it contains the bootloader and information about partitions. Since this size is extremely small for any modern bootloader, it usually contains enough code to load a bootloader stored on an actual partition. For example if you have a Linux/Windows dual-boot, GRUB as a boot manager, and decide to wipe the partition with Linux, you will not be able to boot properly since GRUB can't load.
**GPT** - Current partitioning standard, use it if you have the option.
**BIOS** - First thing that loads when you start up you PC. Obsolete, only supports MBR(or rather, Windows will refuse to work using BIOS+GPT or UEFI+MBR).
**UEFI**(previously **EFI**) - Successor of BIOS, supports GPT, usually has backwards compatibility to allow BIOS booting(and you can use GPT partitioning with that).
Motherboards with UEFI firmware have been the standard for years now, so unless you're working with hardware that's more than few years old it's likely using UEFI.
To update BIOS or UEFI go to your motherboard/laptop manufacturer's website. Looking in the downloads section should give you downloads and documentation on how to update. [1](https://www.asus.com/Motherboards/MAXIMUS_VII_HERO/HelpDesk_Download/)
If you want to read more about this, [here's a handy site](http://www.rodsbooks.com/efi-bootloaders/principles.html).
### CPU architectures
ARM - weaker CPU architecture used in smartphones and such. It is not capable of running x86/x64 code
x86 - 32 bit architecture - obsolete, 32bit desktop CPUs were last made a decade ago. Cannot run x64/ARM code
x64 - 64 bit architecture - current standard for desktop PCs. Can run x86 code, cannot run ARM.
### Creating a bootable flashdrive
[Instructions here](https://rys.pw/Creating_a_bootable_flashdrive)
### Installing an OS
[Windows](https://rys.pw/Windows)
## Components
### Motherboard
### PSU
Find some wattage calculator, get a PSU that has higher wattage than that and make sure it is not shit by getting a Tier 1 PSU [from this post](https://linustechtips.com/main/topic/631048-psu-tier-list-updated/).
### CPU
#### CPU cooler
### GPU
### RAM
#### How to check for failure
Under Arch Linux EFI install:
$ trizen -S memtest86-efi
# memtest86-efi --install
### Storage Drives
#### HDD
#### SSD
#### S.M.A.R.T and Badblocks
[S.M.A.R.T](https://en.wikipedia.org/wiki/S.M.A.R.T.) - is a monitoring system included in computer hard disk drives (HDDs) and solid-state drives (SSDs) that detects and reports on various indicators of drive reliability, with the intent of enabling the anticipation of hardware failures.
Windows: [CrystalDiskInfo](http://crystalmark.info/download/index-e.html) - open source tool
Linux: [Arch Wiki](https://wiki.archlinux.org/index.php/S.M.A.R.T.)
---
[Badblocks](https://wiki.archlinux.org/index.php/badblocks) is a program to test storage devices for bad blocks.
**sudo badblocks -wsv /dev/$drive** - Perform a **DESTRUCTIVE** test on the device. Tests with 4 patterns, so 4 passes which can take a while on an HDD. Useful for new drives or drives which have useless data on them.
**sudo badblocks -nsv /dev/$drive** - Perform a **NON-DESTRUCTIVE** test on the device. Single pass test.
## Benchmarking
#### SSD
#### HDD
## Media
### Images
Today's widely used formats waste a crap ton of space - it is the reason why Dropbox made the lossless Lepton format for JPGs(saves about 22% space on average).
One of the formats you can convert your images to is [WebP](https://en.wikipedia.org/wiki/WebP).
You can use a simple script and ImageMagick to mass convert files - It is not perfect (images will end up being named image.**jpg**.webp) but it does the job.
```bash
for file in *; do; convert $file $file.webp; done
```
### Video
One of the formats you can convert your videos/GIFs/whatever is [WebM](https://en.wikipedia.org/wiki/WebM).
You can use a simple script and ffmpeg to mass convert files - It is not perfect (images will end up being named image.''mp4''.webm, usually only runs on a single thread) but it does the job.
```bash
for file in *; do; ffmpeg -i $file $file.webm; done
```
# Mouse Polling rate
Max mouse polling rate is 1000Hz, as in 1ms response time. Surprisingly I'm having a hard time finding mice that actually do have 1ms response time even though it says so on the spec sheet.
How to check your polling rate:
Windows: [Download](https://www.dropbox.com/s/25cscoa41lxwvrl/mouserate%20polling%20rate.zip?dl=1)
Linux : #TODO
List of mice I've tried so far:
A4 Tech XL-750BK - says 1000Hz, actually is 1000Hz 3600 DPI laser mouse. I'm using this one.
SteelSeries Sensei RAW NaVi Edition - says 1000Hz, is actually 500Hz~.
# Wayland
[https://wiki.archlinux.org/title/Wayland](https://wiki.archlinux.org/title/Wayland)
My list of issues on Wayland -
* [Flameshot can't copy into Wayland clipboard](https://github.com/flameshot-org/flameshot/issues/2107) - Workaround is to use spectacle
* ~~[Flameshot can't use keyboard](https://github.com/flameshot-org/flameshot/issues/2031)~~ - Fixed!
* Can't run Plasma on dGPU mode on Lenovo Legion 5 Pro, it loads into a black screen
* ~~[VSC needs flags to render properly](https://github.com/microsoft/vscode/issues/109176#issuecomment-1037270600)~~ `code --enable-features=UseOzonePlatform --ozone-platform=wayland` - Fixed!
* Chromium flickers like crazy - this is partially caused by [Chromium not defaulting to a wayland session](https://wiki.archlinux.org/title/Chromium#Native_Wayland_support)
* Apps seem to have different clipboards? Pasting into wayland Chromium does not yield the same clipboard entry as pasting into wayland Telegram
* [Apps can't claim focus](https://bugs.kde.org/show_bug.cgi?id=424795) so Konsole doesn't focus on launching new tabs
# 3D Printing
## Protection
According to [this](https://www.draeger.com/Products/Content/ab-selection-guide-fl-9045782-en-gb.pdf) [(backup)](https://rys.pw/attachments/1) selection guide - you need A1 protection for the resin fumes and (FF)P2 or (FF)P3 for the particles from sanding resin.
What I ended up getting was the
* [3M 6200 half-face mask](https://www.3market.cz/6200-medium-3m-filtracni-polomaska-pro-dva-ochranne-filtry--pro-opakovane-pouziti--stredni-velikost/) - 6100|small, 6200|medium, 6300|large
* [3M 6051 A1 filters](https://www.3market.cz/6051-filtr-organickych-plynu-a-vyparu-a1--cena-za-ks/) - 6051i version has an indicator for when the filter goes bad (this one is just 6051)
* [3M 5935 P3 particulate filters](https://www.3market.cz/5935-predfiltr-p3-pevne-a-kapalne-castice--cena-za-ks--prodej-pouze-po-parech/)
* [3M 501 pre-filter holder](https://www.3market.cz/501-drzak-casticovych-filtru-rady-5000--cena-za-ks--prodej-po-parech/) - To attach the particulate filter to the A1 filter (these are not reusable according to 3M)
* [Cappture ES9910ST glasses](https://www.3market.cz/cappture-es9910st--ochranne-bryle--cire-bryle--nemlzive/) - to prevent resin splashing in my eyes
# Lenovo Legion 5 Pro touchpad zones
MSFT0001:00 04F3:31AD Touchpad zones for the Lenovo Legion series and possibly others, painstakingly obtained from Lenovo Support.
[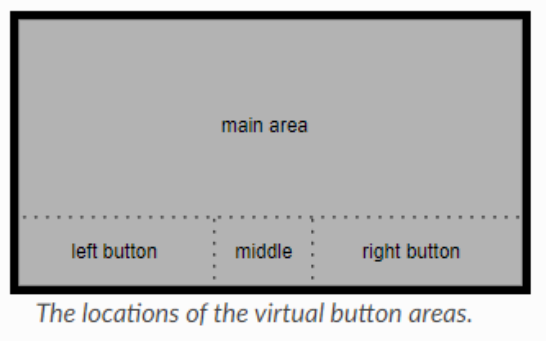](https://rys.pw/uploads/images/gallery/2022-02/image-1644247803781.png)
# Martin Rys
{{@13}}
# Donate
If you find my existence helpful, consider funding it:
* Preferably recurrently via [Ko-Fi](https://ko-fi.com/martinrys), stable income is the best you can give me
* Directly through [Revolut](https://revolut.me/martinrys99) (usually least fees)
* Directly through [PayPal](https://www.paypal.me/MartinRys/10usd) (relatively large fees, Ko-Fi above supports PayPal too)
* Recurrently through [Patreon](https://www.patreon.com/C0rn3j) (somewhat large fees)
# Raspberry Pi 5, NVMe and USB woes
If you have not bought an enclosure/SSD yet, PLEASE make triple sure that what you're buying is compatible between each other and it's not the same cursed enclosure chip I bought. Ideally buy an M.2 hat instead to save yourself some of the issues. You still have to verify compatibility with the SSD if you'll choose a HAT.
After buying a Raspberry Pi 5 8GB, Orico NVMe USB enclosure and ADATA XPG SX8200 Pro 2TB for an SSD, I had an awesome time debugging it for hours, here's some things for you to check to save time.
This thread is linked on [GitHub](https://github.com/raspberrypi/linux/issues/4130#issuecomment-1925489269) and several other places that I found where people struggled to get this working.
* Your devices can misbehave due to out of date firmware
* RPi5 will likely ship with an old bootloader firmware which may cause issues, `sudo rpi-eeprom-update` will show you the current bootloader version, and so will the bootloader screen over HDMI
* Updating bootloader firmware is easy, just boot the official [Raspberry Pi OS image](https://www.raspberrypi.com/software/operating-systems/#raspberry-pi-os-64-bit) flashed onto a mSD card, update OS via `sudo apt update && sudo apt upgrade -y` and reboot.
* You can upgrade further to a [beta bootloader](https://github.com/raspberrypi/rpi-eeprom/blob/master/firmware-2712/release-notes.md) by means of toggling branch in Advanced settings of `sudo rpi-config`, and if that's not going to get you the latest beta as per the link, you can upgrade again via `rpi-update`
* USB Enclosure firmware can be out of date
* If you made the same mistake like me and bought an enclosure with an RTL9210 chip, update FW as per [here](https://www.station-drivers.com/index.php/en-us/forum/enclosures-nvme-sata-usb-3-x/76-nvme-usb-drives-realtek-rtl9210-rtl9220-firmware-version-1-xx?start=0)
* SSD firmware can be out of date, you will not be able to flash it over USB, you have to connect it to actual PCIe, sorry
* Delivering enough power to the USB enclosure and SSD woes - RPi5 with official power supply has total 1.6A amps available for the ports - 5V*1.6A=8W
* USB POWER IS [SHARED WITH THE FAN PORT](https://github.com/raspberrypi/rpi-eeprom/issues/545) - if disconnecting fan fixes your issue, you know what's up
* USB Enclosures have a power limit that they're designed for and won't take more, this shouldn't be a huge problem as the SSDs shouldn't eat their theoretical maximum on the comparably slow USB speeds
* USB Enclosures can have capacitors, you can abuse those to make boot work even when you don't have enough power. If I connect my enclosure to my PC it always loads fine. After disconnecting it after about 5 seconds and immediately putting it in the Pi, it then loads fine in Pi too
* If you're using your RPi5 with an unofficial power supply, it is likely you are using the wrong cable and not getting the full 28W and ports are limited further
* The SSD may be designed to take more power than the enclosure can theoretically provide, my enclosure is 796mA*5V=3.98W, and the SSD I use can apparently peak at about 4.1W. Keep in mind the enclosure will take some minimal power for itself. The peak power consumption is on connect, and presumably on maxed out IO, you are not going to max out IO on the Pi, so you can theoretically run a more power hungry SSD fine
* Cable issues can cause this
* You can be using a USB 2.0 cable/adapter, which will limit power to 500mA, verify communicated USB protocol via `lsusb -v` and checking `maxPower` and `bcdUSB` attributes
* Your cable can be broken, causing the above
* Your cable can be too long, causing the above, even in-spec cables are at risk
* Just because it works with another device does not mean it will work with the RPi5, which seems to have worse ports than RPi4 where it confusingly might work
* More compatibility issues
* Enclosure chip and SSD chip may not like each other
* RPi5 and the enclosure chip may not like each other
* Enclosure chip can announce UAS support but not support it. RTL9210 does this, but if you try to use it with the UAS driver it will crash the moment you put any amount of IO into it. It needs to be added to the quirks blacklist by VID:PID (can get it from `lsusb`) in Linux to work. RTL9210 has [almost made it onto the blacklist in Linux](https://patchwork.kernel.org/project/linux-usb/patch/20240117141132.1023457-1-bruno@clisp.org/) by default for this reason
* Enclosure can be set to autosleep, disconnecting the OS drive after X minutes of inactivity. This can be worked around by either modifying the firmware or constantly writing files
* `sudo rpi-eeprom-config -e` lets you edit the bootloader config
* RPi4 by default resets the power to USB devices on boot through [USB_MSD_PWR_OFF_TIME](https://www.raspberrypi.com/documentation/computers/raspberry-pi.html#USB_MSD_PWR_OFF_TIME), RPi5 supposedly do not seem to do this. Some enclosures do not seem to like this.
* You can also try playing with [USB_MSD_STARTUP_DELAY=3000](https://www.raspberrypi.com/documentation/computers/raspberry-pi.html#USB_MSD_STARTUP_DELAY)
* Not directly related but you can set [HDMI_DELAY=0](https://www.raspberrypi.com/documentation/computers/raspberry-pi.html#HDMI_DELAY) to not block HDMI output for 5 seconds on boot.
# Optimization
```bash
# JPEG/JFIF - lossless
jpegoptim "${filepath}"
# PNG (and ICO that is PNG) - lossless
# zopfli makes the entire thing MUCH slower, but saves more space - question is whether it's worth it inflating compress time by 80x (decompress is the same)
# --strip all or --strip safe options may be of interest if EXIF cleanup is desired, but EXIFtool should suffice for that
# --preserve is of interest if saving timestamp is necessary, and --fast is necessary for --zopfli unless you have a lot of CPU or a lot of time
oxipng --zopfli --opt max "${filepath}"
# SVG - might lose data that other scripts may rely on if the SVG is somehow parsed
# see `plasma/breeze:.../build.sh` where name metadata is fed to inkscape
# Verification that result is smaller is necessary as svgo may actually be
# adding data necessary for correct rendering everywhere.
# That may or may not be desirable, bad for filesize, good for compatibility.
# Corrupt output is possible, take care
svgo --multipass --input "${filepath}" --output "${tempDir}/svgo-$$.temp"
# BMP -> PNG - lossless, but probably requires editing other things that link to BMP
convert "${filepath}" "${filepathWithoutExtension}.png"
# PDF - lossless recompression
# Corrupt output is possible, take care
pdftk "${filepath}" output "${filepath}.tmp" uncompress
pdftk "${filepath}.tmp" output "${filepath}.packie" compress
# GIF - lossless optimization
gifsicle "${filepath}" --output "${tempDir}/gifsicle-$$.temp"
# TTF - Converting to ttx and back with fonttools can gain a little bit of savings
fonttools ttx -q -o "${tempDir}/fonttools-$$.ttx" "${filepath}"
fonttools ttx -q -o "${tempDir}/fonttools-$$.ttf" "${tempDir}/fonttools-$$.ttx"
# EXIF in PNG/JPEG/JFIF
# Delete ALL EXIF data, might be dangerous and remove useful things like color profiles
exiftool -v -preserve -overwrite_original -All= "${filepath}"
# Delete old hostcomputer watermark, anything related to thumbnails and Software used for creation
exiftool -v -preserve -overwrite_original -HostComputer= -ifd1:all= -Software= "${filepath}"
```
A lot of files scattered around the internet have pointlessly large file sizes, which modern software can optimize out, or they weren't meant to be there in the first place.
The above commands try to do so without losing any data. Further file size savings can be achieved by means of `exiftool` and removing extra unnecessary EXIF information, but that is entering lossy territory, as it can often carry useful or necessary information.
# IoT
Internet of Things done securely.
IoT devices can use a range of technologies for communication, Wi-Fi, Bluetooth, Zigbee, Z-Wave, Thread, Matter ...
Companies like Tuya provide smart chip integration for existing devices of other manufacturer's, so the quality of varioius \-enabled devices can vary.
IoT devices tend to have a lot of issues:
* Run closed source firmware which is not secure from the get go
* The manufacturer gives up on supporting it near immediately
* The manufacturer requires a subscription to keep it running
* The device is impossible to integrate with open source solution like Home Assistant
Important resources:
* [LibreTiny chip list](https://docs.libretiny.eu/docs/status/supported/)
* [Elektroda.com](https://www.elektroda.com) - Forum with teardowns, home of OpenBeken
* [OpenBeken device list](https://openbekeniot.github.io/webapp/devicesList.html)
* [Tasmota device support](https://templates.blakadder.com/)
* [Zigbee device support](https://zigbee.blakadder.com/index.html)
* [ESPHome device list](https://devices.esphome.io/)
* [Custom firmware for Zigbee 3.0 IoT devices](https://github.com/pvvx/ZigbeeTLc)
Zigbee:
* Zigbee2MQTT
* [ZHA](https://www.home-assistant.io/integrations/zha/)
Wi-Fi has much higher power consumption than other solutions like Zigbee, therefore do not rely on Wi-Fi for devices that are battery powered, you'll end up replacing the battery way more often.
Zigbee is a mesh network - battery powered devices are generally only End Devices, but AC powered devices usually also act as a Router.
LEDs:
* LED lights have various configurations like RGB, RGBW, RGBCW, RGBCCT, ... read more about that [here](https://www.ledyilighting.com/rgb-vs-rgbw-vs-rgbic-vs-rgbww-vs-rgbcct-led-strip-lights/#What_is_RGBCCT_LED_Strip_Light) - some sellers will state combined wattage of the light when selling lights, for example, so 3(R)+3(G)+3(B)+5.5(CW)+5.5(WW) would be 20W, and then you may be surprised that a 9W light is brighter in CW/WW mode.
# Proxy over SSH
I wanted to tunnel my SSH SOCKS5 proxy out to Wi-Fi, here's a little how to, DNS included:
```bash
# Create the SOCKS5 proxy bound to 127.0.0.1:9050
ssh -N -D 9050 socksproxy@123.1.2.3
# Verify
[0] % \ss -tulpn | \grep 9050
tcp LISTEN 0 128 127.0.0.1:9050 0.0.0.0:* users:(("ssh",pid=1407523,fd=5))
tcp LISTEN 0 128 [::1]:9050 [::]:* users:(("ssh",pid=1407523,fd=4))
# Verify in Firefox that the proxy indeed works
# -> It does
```
Create a network for systemd-networkd:
```ini
File: /etc/systemd/network/wlan0.network
────────────────────────────────────────
[Match]
Name=wlan0
[Network]
Address=10.42.0.1/24
DHCPServer=yes
[DHCPServer]
DNS=10.42.0.1
Domain=lan
```
Create an AP profile for iwd:
```ini
File: /var/lib/iwd/socks.ap
───────────────────────────
[Settings]
SSID=Socks
Security=psk
Passphrase=password
```
Create the AP:
```
[iwd]# device wlan0 set-property Powered on
[iwd]# device wlan0 set-property Mode ap
[iwd]# ap wlan0 start-profile Socks
```
Create the iptables rules:
```bash
# Option 1) (DNS over TCP won't work with this setup)
iptables -t nat -N VSOCKS
iptables -t nat -A VSOCKS -p tcp -j REDIRECT --to-ports 12345
iptables -t nat -A PREROUTING -s 10.42.0.0/24 -p tcp -j REDIRECT --to-ports 12345
```
```bash
# Option 2
iptables -t nat -N VSOCKS
# 1) Don't touch DNS traffic (TCP) - let local DNS server handle it
iptables -t nat -A VSOCKS -p tcp --dport 53 -j RETURN
# 2) Also don't redirect traffic destined to the local resolver IP (cloudflared)
iptables -t nat -A VSOCKS -d 10.42.0.1 -j RETURN
# (optional) also ignore localhost if you have any local services
iptables -t nat -A VSOCKS -d 127.0.0.1 -j RETURN
# 3) Redirect remaining TCP to vsocks
iptables -t nat -A VSOCKS -p tcp -j REDIRECT --to-ports 12345
# 4) Hook the chain for clients from your AP network
iptables -t nat -D PREROUTING -s 10.42.0.0/24 -p tcp -j REDIRECT --to-ports 12345 2>/dev/null || true
iptables -t nat -A PREROUTING -s 10.42.0.0/24 -p tcp -j VSOCKS
```
Run cloudflared on the same host as vsocks to enable DNS proxying:
```
sudo cloudflared proxy-dns \
--address 10.42.0.1 --port 53 \
--upstream https://1.1.1.1/dns-query \
--upstream https://1.0.0.1/dns-query socks5://127.0.0.1:9050
```
Run vsocks:
```bash
vsocks 0.0.0.0:12345 127.0.0.1:9050
[vsck] VSocks - ver. 1.05.1a
[vsck] load: A:0/0 B:0/0 *:1/256
```